How To Create Your Own Computer Clock Using Notepad
Notepad Tricks

How To Create Your Own Computer Clock Using Notepad

Today we are going to show you an interesting notepad trick which lets you to create your own Computer Clock with date and time . You can customize the given code by changing the title and also color .

Steps To Create Your Own Computer Clock Using Notepad :

Step 1 : Open Notepad :


Go to your Desktop , Then Right click the mouse button and select Text Document option . ( Or Press ” Windows + R ” And Type Notepad)

Step 2 : Copy – Paste :

Now just copy the below given code and paste it into your Notepad.
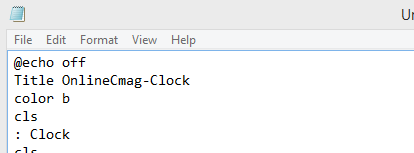
Today we are going to show you an interesting notepad trick which lets you to create your own Computer Clock with date and time . You can customize the given code by changing the title and also color .

Code :

@echo off
Title OnlineCmag-Clock
color b
cls
: Clock
cls
echo Current Date: %date%
echo ............. 
echo .............
echo Current Time: %time%
goto Clock

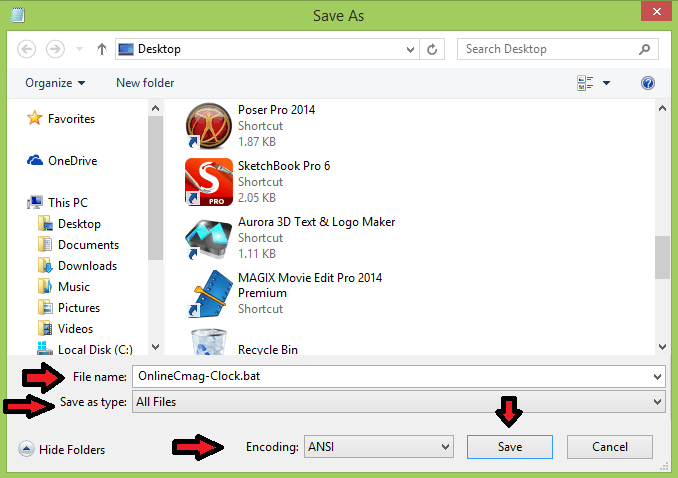
Step 3 : Save the File :

Now Save this file with a ” .bat ” extension i.e something like ” OnlineCmag-Clock.bat ” . Select the file type as ” All Files ” and encoding To ” ANSI ”  .

Today we are going to show you an interesting notepad trick which lets you to create your own Computer Clock with date and time . You can customize the given code by changing the title and also color .

Step 4 : Run the file:

Today we are going to show you an interesting notepad trick which lets you to create your own Computer Clock with date and time . You can customize the given code by changing the title and also color .

Open the file by just double clicking on it. Now you can see that it shows both date and time .

I hope you all liked it . The final output will be as below …

Today we are going to show you an interesting notepad trick which lets you to create your own computer Clock with date and time . You can customize the g...

0 thoughts on “How To Create Your Own Computer Clock Using Notepad

  1. luis says:

    Wow ! Working

Leave a Reply

Your email address will not be published. Required fields are marked *