Do you have an old USB drive which you don’t use anymore? Then you can turn it into an operating system installation disk for Windows, Mac or Linux or any diagnostic tool for your PC. Follow the steps below to built a Bootable USB drive .
Steps To Build a Bootable USB Drive :
Step 1 : Open your Command Prompt :
For this you will have to run the Command Prompt as an Administrator . So Right-click on ” cmd ” and select the Run as Administrator option . You will be asked to enter the Administrator password.
By using this method you can create a bootable USB drive . After creating the bootable USB drive , you can directly copy the contents of an operating installation disc into the USB drive to create the required portable installation drive.
This method only works in Windows 8,7,Vista, Win XP.
Step 2 : Open ” disk management utility ” :
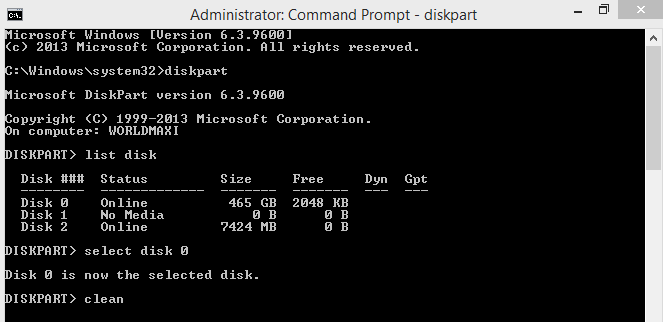
To open the ” disk management utility ” enter the command ” diskpart ” in the command prompt.
C:\Windows\system32\diskpart
Step 3 : Display the connected disks :
Now type the command ” list disk ” , which shows a list of the drives that are connected to your computer. The USB drive which you want use will also be listed here . Make a note of the number next to your USB drive.
DISKPART> list disk
Step 4 : Select the USB drive :
Now Enter the command ” select disk @ “, replace ” @ ” with the disk number which you want to use as your bootable usb drive .
DISKPART> select disk 0
Step 5 : Clean the flash drive :
Enter the command ” clean ” to erase all data in that particular drive .
DISKPART> clean
Step 6 : Create a bootable partition:
Once your USB drive is clean, type the command ” create partition primary ” .
DISKPART> create partition primary
Step 7 : Select the new partition :
Now enter the command ” select partition 1 ” . Once you receive a message saying that ” partition 1 is now the selected partition ” , type the command ” active ” and press Enter. This will activate the selected partition.
DISKPART> select partition 1
partition 1 is now the selected partition
DISKPART> active
Step 8 : Format the USB drive :
Now enter the command ” format fs=fat32 “. When you click Enter, the program starts formatting the USB drive which may take few minutes. Progress will be shown as a percentage.
DISKPART> format fs=fat32
Step 9 : Assign the USB a drive letter:
Enter the command ” assign” to give the USB drive a letter designation. Now type ” exit ” command to end up the disk management program.
DISKPART> assign
Step 10 : Copy the operating system :
As your USB Bootable drive is now ready, you can copy over the installation filesof the operating system which you want to install. You can do this by dropping and dragging using your preferred file explorer/manager .