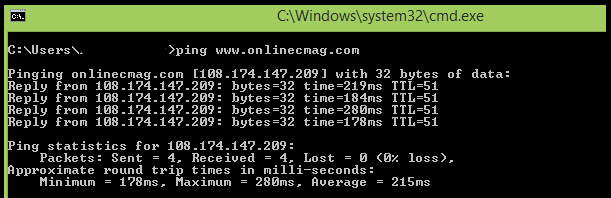
Latest TrendsHow to backup your data using File History in WindowsPC Hacks How To Control The User Login Time In Your ComputerPC Hacks / Security Everything You Need To Know About Internet PortsWeb Guides Open Port 25 To Fix The Simple Mail Transfer Protocol ( SMTP ) ProblemWeb Guides How To Check The Performance Of Your Network And Internet connectionsPC Guides / Web Guides What Do You Think Blue Screen of Death (BSoD) is?PC Guides 6 Point Cheat Sheet To Speed Up Your Slow ComputerPC Hacks / System Performance Get the latest in Tech, once a week. Free. Email address: Leave this field empty if you're human: VR/ARTop Virtual Reality Headset For Gaming In 2017Virtual Reality 10 Reasons Why Virtual Reality is Far More Than Just GamesVirtual Reality A Sneak Peak Into Apple’s AR Integrated iPhone VisionVirtual Reality Top 5 Magical Augmented Reality Books To Delight Your KidsVirtual Reality Sony Patents Tracking System For PSVR And Its Similar To ViveTech News / Virtual Reality Heard of VR Social Networking Yet? Facebook And Competitors Are Putting It TogetherVirtual Reality Security How To Control The User Login Time In Your ComputerApril 7, 2024PC Hacks / SecurityHaving control over an administrator account allows you to do certain things, and also you will have the administrator privileges on the system, which gives you an extra advantage over all other users on the system. It is very easy to control the user’s log in time in that system by using command prompt . When a deadline for a particular user is established, the user can only access the system in that particular period . Steps To Control The User Login Time : Step 1 : Open Command Prompt : You open it by just simply entering ” cmd ” in your window’s search box Or press ” Windows + R ” ( Run dialog box will be displayed ) and type “ cmd ” in it . Step 2 : Use Syntax : ” net user ” is the syntax to set the login time. Type in ” net user Username /time:M-F,06:30-21:00 ” .This is the syntax to set the login times for a week . Replace the word username with any registered username on your computer. This means that the selected user has access to his account ; Monday- Friday from 8:00 a.m. – 9:00 p.m . Hit enter. Step 3 : Specifying Different Times Daily : You can also use the below given form for specifying different times daily. Go to the command prompt as shown above. Enter ” net user Username /time:M,6am-12pm;T,3pm-9pm;W-F,4am-1pm “. This method allows you to set the allocation to the user in different ways for each day. You can do the same by simply entering the day, followed by a comma , and the time range , and a semicolon . Tips : You can specify the time in military format as 18:00-24: 00 or you can also use the standard time format as 6:00 am – 9:00 pm . If you want to have a user with complete login time for every day of the week, then simply write the syntax like: ” net user Username /time:all ” .... Easy Way To Change Your Proxy settingsApril 3, 2024PC Hacks / Security / Web GuidesWant to hide your web activity from the prying eyes ? Are You blocked from accessing some websites that you need , By the government or office, or the school ? Don’t worry Proxies allow you to bypass the locks placed on your connection and hide your IP, Which makes your actions more difficult to follow. Once you find a proxy server you want to connect, you simply need to enter that information in your web browser. Steps To Change Your Proxy Settings : Step 1 : Click on the Menu button: This is in the top right corner of the Chrome window, and it looks like three horizontal bars. Step 2 : Select Settings : This will open a new tab in your browser. Click on the link ” Show advanced settings ” which is at the bottom of the page. Step 3 : Click on the ” Change proxy settings ” : This is located in the Network section of the advanced settings. When you click this button, the Internet Properties dialog box will be displayed. Note: Changing proxy settings in Chrome is linked to your operating system, and as such will affect all applications or programs that are connected to the Internet. If you do not want to change this setting, you need to download a Chrome extension like Proxy Helper or ProxySwitchSharp . Step 4 : Click the “LAN Settings” button : Now a ” Local Area Network Settings ” dialog box will be displayed . Uncheck the ” Automatically detect settings ” check-box and Check the box in the ” Proxy Server ” section. Step 5 : Enter the proxy information : Enter the IP address or domain, and also the port to which you want to connect. Click OK when finished. When you have finished using your proxy and wish to return to your direct connection, open the LAN settings again and check the ” Automatically detect settings ” and uncheck the box that is in the ” Proxy server ” section. Share Your Views In Form Of Comments…... What is a CAPTCHA and Why Does A Website Need Them Anyway?March 30, 2024Security / Web Guides / WordPressEven if you are a very average internet user, you must have had your experiences with CAPTCHAs. Whether its booking movie tickets online, creating email accounts or while accessing various websites; these CAPTCHAs slow us down and tests if we are human. Yeah! They certainly are annoying but since they are meant to serve a specific purpose, let them be. Anyway, there not really is any need to understand what CAPTCHAs are to break them down but for all you enthusiasts; this article will address everything you would like to know about a CAPTCHA. Okay, so What is a CAPTCHA? CAPTCHA is a shortened term for ‘Completely Automated Public Turing Test to Tell Computers and Human Apart’. More simply, they are those twisted letters usually with various fonts you mostly encounter during filling online forms. It obviously is a test that is designed for people to prove themselves as a human to the computer. CAPTCHA was first used in 2000 and the most unique feature of this test is, it is very simple for humans. At the same time, it is very difficult for software bots (the automated programs for filling forms). But, Why use a CAPTCHA? The main intention behind designing CAPTCHAs is to discourage spammers and hackers in abusing internet resources. The computers and internet bots (automated programs) are very fast, the fact that they are completely built on 1s and 0s makes them weak in identifying things a human can intercept. So for humans, it hardly is a test but for bots, it really is a test! Okay, we accept it isn’t rocket science and weakly designed CAPTCHAs are easily cracked; Still, there isn’t any universal algorithm in offering these bots human-like intelligence. And still cracking 90% of CAPTCHAs requires a real skill-set hacker. How These CAPTCHA Work, Actually? CAPTCHA are usually .gif pictures of scrambled and manipulated letters. These pictures are so designed that they don’t contain the letters on the image in the HTML. So for software bots, it is only an image and the letters on it are non-existent. The other way around, there are software that can scan these images and interpret the letter present on the image, but it could be possible only if the letters are not so distorted; but that’s not the case with textCAPTCHA. The mostly used other types of CAPTCHAs are the .mp3 format recordings, in which a distorted voice speaks out letters or words and a human must enter them into the box and submit. This system is so effective that even the CAPTCHA has no idea about the letters being shown. What all can a CAPTCHA stand against? CAPTCHAs since their introduction could prevent numerous abusive online activities. These include the blocking of spammers from submitting automated comments to blogs aiming SEO; unnecessary creation of (signing up for) hundreds of email accounts.... Web GuidesEverything You Need To Know About Internet PortsWeb Guides Open Port 25 To Fix The Simple Mail Transfer Protocol ( SMTP ) ProblemWeb Guides How To Check The Performance Of Your Network And Internet connectionsPC Guides / Web Guides Are The Public and Private IP Address Different?Web Guides Join Our Tech Community For Free Like Us How To How to backup your data using File History in WindowsApril 20, 2024PC HacksFile History update is a Windows 7 feature , which was not well known and therefore very few people used it. This tool provides a user interface which is easy to access and has more features and was designed to create backup copies of previous versions of your files and important data . So that if something goes wrong, you have multiple versions to restore. Users who are familiar with the application known as ” Time Machine ” developed for Mac, Apple will recognize this concept immediately. However, this program has been introduced in Windows 2003, but then had a more basic form. Steps To Backup Your Data Using File History : Step 1 : Open Control Panel : Move your mouse to the top right corner of the screen and click on Search. Now type ” Control Panel ” and hit enter. Step 2 : Save Copy Option : In the Control Panel, Click on the ” Save copies of your files with File History ” option located under the ” System and Security ” section . Step 3 : Enable ” File History ” : To enable ” File History ” connect an external storage device (such as a USB stick), Windows will automatically detect and configure the location of file history storage; or go to a network folder you want to use for this purpose. Step 4 : Restore : To restore files, click on the ” Restore personal files ” option located on the left side of the main screen of file history. Then a user friendly interface to navigate recovery files will appear. Simply go to the folder where your file is stored and use the arrow at the bottom of the screen to move forward and backward in time. When you find the file you’re looking for, just right-click on it to view all previous before pressing the big green button that lets you restore the version you want. Step 5 : Set The File Backup Time Interval : To increase the frequency with which Windows creates backups of your files, just click on the “Advanced Settings” to the right of the Windows File History tab. Now change the setting of “Save copies of files ” as you need . Step 6 : Offline Files : To access offline files, check the options of history files in the Advanced Setup window. This is ideal for people who travel because when you’re away from the source where you store your backups (eg when you’re traveling with your laptop), you work on the files to be stored on the local formal when you’re back, are synchronized with the location of your backups. Step 7 : Exclude Folders : If you want exclude a specific folder from automatic creation of backups, click on the ” Exclude Folders ” option on the left of the main window of the file history .... How To Control The User Login Time In Your ComputerApril 7, 2024PC Hacks / SecurityHaving control over an administrator account allows you to do certain things, and also you will have the administrator privileges on the system, which gives you an extra advantage over all other users on the system. It is very easy to control the user’s log in time in that system by using command prompt . When a deadline for a particular user is established, the user can only access the system in that particular period . Steps To Control The User Login Time : Step 1 : Open Command Prompt : You open it by just simply entering ” cmd ” in your window’s search box Or press ” Windows + R ” ( Run dialog box will be displayed ) and type “ cmd ” in it . Step 2 : Use Syntax : ” net user ” is the syntax to set the login time. Type in ” net user Username /time:M-F,06:30-21:00 ” .This is the syntax to set the login times for a week . Replace the word username with any registered username on your computer. This means that the selected user has access to his account ; Monday- Friday from 8:00 a.m. – 9:00 p.m . Hit enter. Step 3 : Specifying Different Times Daily : You can also use the below given form for specifying different times daily. Go to the command prompt as shown above. Enter ” net user Username /time:M,6am-12pm;T,3pm-9pm;W-F,4am-1pm “. This method allows you to set the allocation to the user in different ways for each day. You can do the same by simply entering the day, followed by a comma , and the time range , and a semicolon . Tips : You can specify the time in military format as 18:00-24: 00 or you can also use the standard time format as 6:00 am – 9:00 pm . If you want to have a user with complete login time for every day of the week, then simply write the syntax like: ” net user Username /time:all ” .... 6 Point Cheat Sheet To Speed Up Your Slow ComputerApril 5, 2024PC Hacks / System PerformanceIs your laptop or desktop slow in processing something? Is it too slow to upload files or applications, and is it taking a long time to start? It’s a fact you can’t escape from. Even if you are careful and never download questionable content, with time, your system will automatically accumulate more registry entries, errors, and other garbage which automatically slows down your computer. Steps To Speed Up Your Slow Computer Step 1: Update your antivirus and run a scan Antivirus will help protect you from viruses and other suspicious files. Make regular checks and detects extraneous files that try to infiltrate your computer. Kaspersky and Norton are good reliable antivirus brands, and you can get them at a low cost. Do not use programs like the registry cleaner to improve your registry. They cause you more harm than good. Step 2: Cleanse your hard disk space Deleting the unnecessary files on your computer is a quick and easy way to free up memory and improve performance. In Windows XP , 7 and Vista : Go to ” Start> All Programs> Accessories> System Tools> Disk Cleaner “. If multiple drives are present then it will ask you to specify the drive you want to clean. In Mac: Go to “Applications> Utilities> Terminal”. In Terminal, type ” sudo rm -fr / tmp / * ” and press Enter. Then all the temporary files in your computer will be removed. Step 3: Uninstall The Unnecessary Programs These may include games or files that you do not use. In Windows: Go to ” Start> Settings> Control Panel ” . In control panel, click on the ” Uninstall A Program” option under the programs section. List of all the programs in your computer will be displayed, Remove or Uninstall all the unwanted applications. In Mac: Directly delete all programs that you do not want to use. Don’t forget to empty the recycle bin ( Trash bin )after deleting them, As they still occupy space in your hard disk. Just right click the recycle bin and select ” empty recycle bin “. Step 4: Download and install a spyware remover software Spyware is a program that monitors information without your notice. For privacy and health of your computer, it is always recommended to remove the malware and spyware. You should be able to download an anti-spyware software for free. Once you download it, install and run it; if you can’t use it, follow the instructions. Step 5: Defragment your hard drive Fragmentation is basically when your computer files are disarranged and affecting the ability of your computer to place the information in sequence. Defragmentation fixes this problem. In Windows: Click on ” My Computer> Properties> Tools “. Now click on “Defragment” and run the program. You can make your computer to start defragmentation periodically ( after certain intervals ). In Mac: The OS will not really need to do this, thanks to the optimization standards of Apple devices. Step 6: Check your RAM These are memory chips that store information on your computer while it works. If it is not enough for your computer, it will start using up your hard drive, but This is a slower process. If this happens, the computer will start to be slowing down. you can hear it and also watch the LED to glow automatically. Right-click on ” My Computer> Properties> General “. For Windows XP, it should be more than 256 MB. If it is less than 1024 MB, then its a problem. If the RAM is the problem, your computer will be slower to open a new application. If your computer is slow when you turn it, then it’s another problem. Before buying more RAM, make sure that you know exactly which type is compatible with your computer and check if you still have empty slots where you can insert your RAM. For most people, it is better to take your computer to a Repair shop....