Categories
PC Hacks Security Web Guides

Hide your IP Address And Stay One Step More Secure On The Internet

Online privacy is one of the most important aspect that you should consider. If you don’t then things could end up disastrous. Usually IP addresses are like your footprints, and often should not be known by the websites you visited or other users. So there are a number of methods to hide your IP address and thus making your online life a bit more secure.

Also See: How To Find The IP Address Of Your Computer

What Is An IP Address? It is your identity on the internet, which identifies your computer, smartphone, tablet, or anything else with which you are connected. As we always say ” If it’s on the internet, it isn’t private ” , Any server which you connect to, or any internet user can easily obtain your IP address.

By using IP address they can obtain the data such as the country you live in, what browser you use, even know your Internet habits and also have a chance to know your computer’s IP address. If someone else knows all such details about you and your computer, then your security is truly under question.


Hide your IP Address And Stay One Step More Secure On The Internet


How to Hide your IP Address ?

There are several methods to hide your IP address in order to protect your privacy , but neither method is 100% effective only hinder your crawl. Here are the three methods to hide your IP address:


#1 Web-Proxies:

This is the fastest and simplest method. No need to install anything on your computer or on your web browser. All you need to do is, just move on to any web-proxy website and enter the address that you want to access anonymously in the search bar. Now you will be redirected to your requested website by hiding your IP address.

Many of these proxies allow additional settings, such as advertising, cookies or applications running on the website and many more. There are now many web proxies, both free and paid versions, some of them are:


#2 Configure the proxy settings in the browser :

Another method is to configure the proxy settings in your web browser. So by using this method you can directly use your web browser itself so as to hide your IP address. To do this you must access the settings of your browser and establish a web proxy of your choice.

Another possibility to hide your IP using the browser is to install extensions that help us to maintain our privacy and security.


#3 Proxy software :

These proxies have to be installed on your computer , and work the same way as any normal program. One of the best known software proxies is the ” TOR Project “, which besides being free, it is one of the most reliable and safe to hide in the network methods. TOR browser is also pretty popular and is being used by thousands of people worldwide.

It is composed of a network of computers called nodes. When you connect to TOR, it follows a path through the various nodes and finally connect to the server, making it quite difficult to find the source as you can seamlessly connect to the network from a node located in any other country. Besides this, communications through the TOR network are encrypted , making it even more difficult.

We don’t say its unchangeable but surely it isn’t going to give way to intruders so easily.

Categories
PC Hacks Security

How To Remove Sensitive Data ( Metadata ) From Microsoft Word

When we share anything on the Internet, we are only intended to publish the data that we want. We don’t want any incriminating information containing data that calls into question our privacy (Sensitive Data). When we publish any document or file, we are often unaware of the amount of data that is hidden and carried along. That might be like author, resolution, size, etc. to avoid this, today we are going to teach you the way to delete all your private data that is attached to your document.

How To Remove Sensitive Data ( Metadata ) From Microsoft Word

Internet is a medium that allows us to share all kinds of files like photos, videos, presentations, documents and many more. It is a good showcase to publicize what we want others to see. However, we are not always aware that we don’t want certain data to be published . This applies to documents that are created with Microsoft Word. In many cases, after writing the documents or articles, we just share in the net, believing to have full control of what is published . But this is not so.

Along the document, it adds a series of data that can compromise your privacy. Reflect the information regarding the creation dates, resolution, size, author, etc. They are in short private data (also called sensitive data or metadata). But there’s no need to worry as Microsoft Word allows us to remove this sensitive data.

How To Remove The Sensitive Data From Your Word Document :

Through few simple steps we will get rid of these private data that should not be published. To do this, the first step is to open the document that you want to publish. Emphasize that we have tested through Microsoft Word 2010, but also works in other editions.

metadata

Now just move on to the file tab and click on info option. Now click on the check for issues option from the displayed list. It will display a small menu with three options, all related to the preparation of the document before sharing. Click on the Inspect Document option then it will open a window with a list of options. Only mark Document Properties and Personal Information and then click Inspect.

In case you are using any of the earlier editions of MS Word, then you can find this Inspect Document option in the Prepare Tab within the Office button to the top left of your MS Word window.

When the scan is completed, it will show you the data found. In our case, we detected document properties and author. To delete this data just simply select Remove All and then click Close. With this simple action our document will be free of private data and we can publish without any effect.

As we have seen, a very simple making process. With these few steps we managed to delete data that should not be published and that endanger over privacy on the Internet .

Now that you know why what this is all about.. Do you doubt if this is all really important? Share with us.

Categories
PC Hacks Security

Set-Up The Incognito Mode As Your Default Browsing Mode

Today we are going to explain you the way to setup incognito mode as your default browsing mode without pressing ” Ctrl + Shift + N “. If you are unaware of what is an incognito mode then you can check out this article where it was previously explained on OnlineCmag .

Steps To Setup The Incognito Mode As Your Default Browsing Mode :

Step 1: Create a Shortcut :

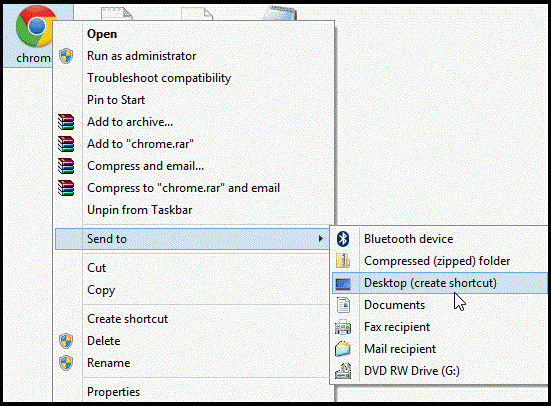
You need to create a shortcut of ” chrome.exe ” file. You can find this in your program files Or program files (x86). Use this path as reference ” C:\Program Files (x86)\Google\Chrome\Application ” ( Change the ” C ” to the drive on which all your program are being installed ).

Set-Up The Incognito Mode As Your Default Browsing Mode , Today we are going to explain you the way to setup incognito mode as your default browsing mode without pressing " Ctrl + Shift + N ". If you are unaware of what is an incognito mode then you can check out this article where it was previously explained on OnlineCmag .

Step 2: Move On To Properties :

Right-Click on the shortcut and select the properties option.

Set-Up The Incognito Mode As Your Default Browsing Mode , Today we are going to explain you the way to setup incognito mode as your default browsing mode without pressing " Ctrl + Shift + N ". If you are unaware of what is an incognito mode then you can check out this article where it was previously explained on OnlineCmag .


Step 3 : Change The Path :

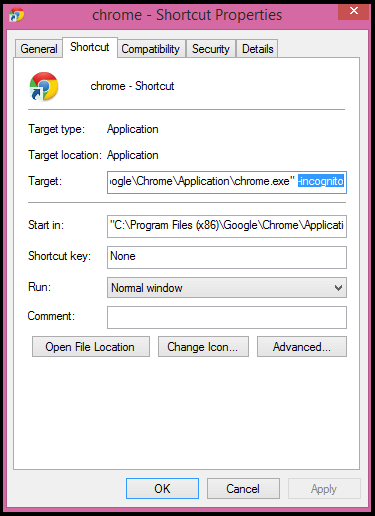
Now add the text command ” -incognito ” to the path specified in the target text box as shown in the below image.

"C:\Program Files (x86)\Google\Chrome\Application\chrome.exe" -incognito

Set-Up The Incognito Mode As Your Default Browsing Mode

After this change, when ever you launch the application from this shortcut it will directly open the chrome’s incognito mode.

Share Your Views In Form Of Comments …

Categories
PC Hacks

FILEminimizer Pictures: The Best Freeware For Image Compression

With technology advancements, digital cameras and the cameras built in our phones carry photos of higher quality which obviously are larger in size . This creates problem while sharing these images between computers . As a result people have been opting for cloud storage services . Cloud Storage is is better but isn’t exactly the solution because it takes a lot of time uploading and downloading these images .

To help you with this task of image compression, ” Balesio ” developed an application known as ” FILEminimizer Pictures ” with which you can make a quick image compression of as many photos as you want. Later you can store them or send them directly via email.

The developers indicate that the compression rate reaches 98%, but based on the study we have made ​​here in OnlineCmag.com, you can see for yourself that the usual image compression is around 80% , a figure that is not at all bad .

Unlike other applications that perform compression as Winrar or Winzip; FILEminimizer Pictures can access the file directly without requiring any decompression and hence can simply reduce the weight of the file.

To take advantage of this great freeware, just download it from the link available at the end of article.

Image Compression By FILEminimizer-pictures:

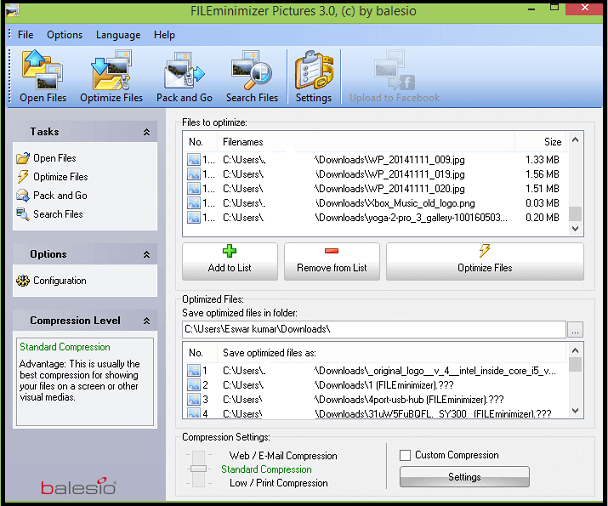
Installation is performed regularly and once you open the application the following main options will be displayed.

FILEminimizer Pictures: The Best Freeware For Image Compression

Open Files: Allows the application to load as many pictures you want.

Optimize Files: Performs compression for the uploaded files.

Optimize and Send: Make compressing files uploaded and then allows you to email them.

Search: Allows searching within your team to locate image files.

Settings: Allows you to modify different aspects of the application.

In addition to these basic options, this allows you to select different degrees of compression even lets you set compression to a particular screen resolution.

Balesio | FILEminimizer Picture

Categories
PC Hacks Security

Increase Your System Security By Using Facial Recognition

Here comes the ultimate solution for those who often forget their Window’s password. By using this application you can simply access your computer just by sitting in front of it. Today we are going to show you how this fantastic program works. By using this application, no one can access the computer without your permission, unless you have a twin brother / sister.

Luxand Blink! is an application of biometric access that allows the user to access Windows by facial recognition. The user’s face is captured via Webcam, and compared with previously registered profile. Thus, the application can allow or deny access to Windows.

Luxand Blink! makes it extremely easy to access the system without entering any name and password in the window’s login.

System Requirements To Run This Application :

  • Operating System : Any version of Microsoft Windows .
  • Webcam compatible with DirectShow.
  • Needs 18 Mb of free disk space on the hard disk.

Steps To Setup The Facial Recognition :

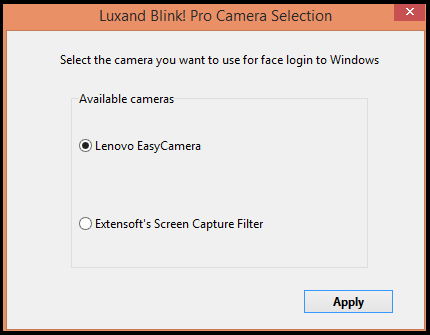
The first thing is to install this application, during the installation process it will ask you to select the webcam that you want to use.

Increase Your System Security By Using Facial Recognition

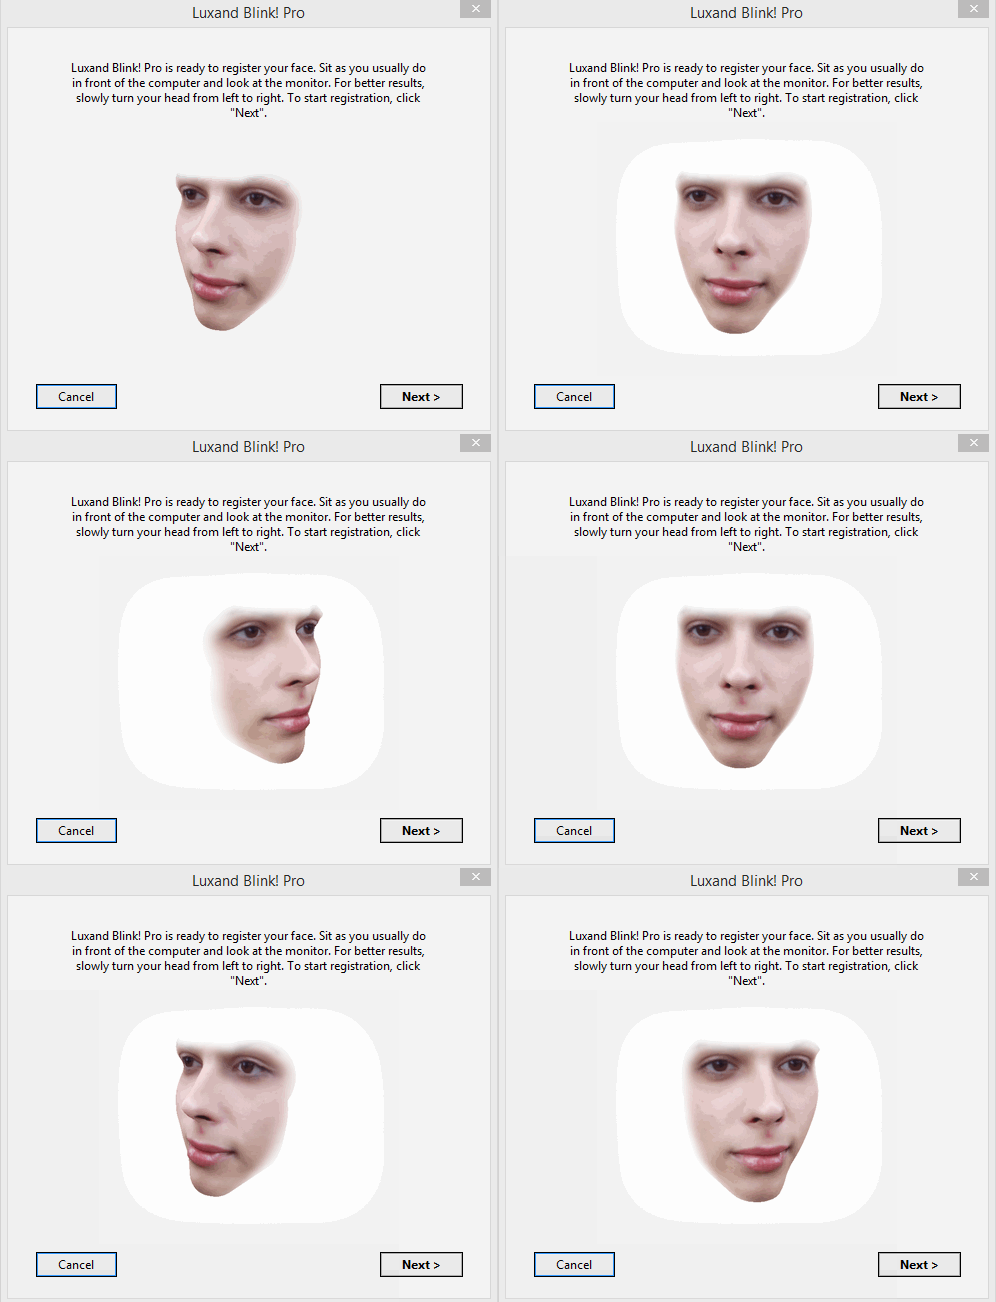
Once installation is complete, start the assistant for face recognition by clicking on Next.

Increase Your System Security By Using Facial Recognition

Now it will show you how to stare for proper recognition. Click on Next to continue .

Increase Your System Security By Using Facial Recognition

In the next window facial recognition will be started. You just stare ahead and turn your head to the right and left until the recognition process is finished, it just takes a few seconds.

After registering your faces successfully, you will be asked to enter the system password. After entering the password just click on Finish.

Increase Your System Security By Using Facial Recognition

Test The Application :

To test its proper functioning, you can Logout and log back into your windows by using facial recognition . You can also enter windows by just typing the username and password as usual.

You can access the application settings by right-clicking on the Luxand Blink icon shown in the toolbar.

Application settings :

  • Face authentication login : Enable or disable the facial recognition.
  • Register my Face: Register a new face
  • Select camera: Choose a different camera.
  • Help file: Opens the web help.
  • The program runs at Windows startup: If this option is disabled the program does not start when Windows starts but will enable facial recognition.
  • View the login history: In this section we will have all the unsuccessful attempts to login by face recognition, for example if someone sits in front of the computer and tries to login , then this application will capture the image of the person and stores it a side. So you can also see who has tried to access your computer without your permission.
  • High security: By enabling this option,the application will learn something new whenever you log in with your face, like a haircut or a day without shaving etc.
  • High convenience: This is a training mode.

Our Team has tested this application and it works perfectlt fine, Eg: You can not use a photograph of the registered face to login into the system . So nobody except your twin brother/sister can login to the system. Also in case of failed login you can easy catch the intruder red-handedly .

Categories
PC Hacks System Performance

How to manage your partitions in Windows

Partitioning can increase the performance of your computer and can help you better in managing your information.

How to manage partitions :

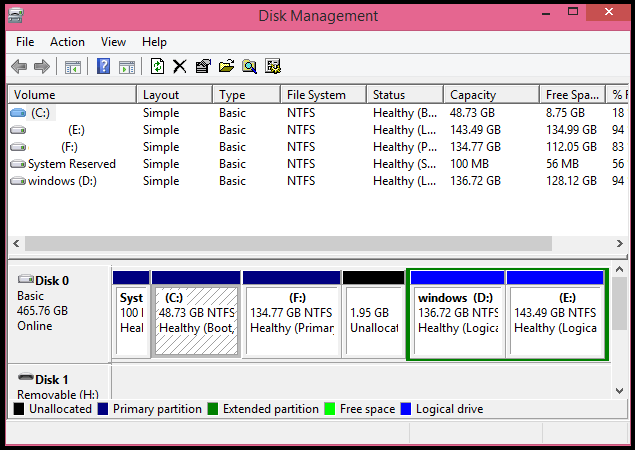
To make any changes to the partitions you must open the ” Disk Manager “. It is a proprietary Windows application that lets you create, delete or merge any partition.

  • To open this program press the keys ” Windows + R ” and type ” diskmgmt.msc ” in the displayed Run dialog box.How to manage your partitions in Windows

How to create a partition in Windows :

The easiest thing is to create a partition. Just what it does is, it tricks the computer’s hard drive to divide into two or more parts depending on requirement.How to manage your partitions in Windows

Steps To Follow :

  • Right click on the drive on which you want to perform partition and select ” Shrink Volume ” option.How to manage your partitions in Windows
  • It takes a bit and when loaded, write the amount of space that you want to assign for the new partition.How to manage your partitions in Windows
  • So if you have 1000000 MB, and you want two partitions, one of 980000 MB and another of 2000 MB, then type 2000 MB in the ” Enter the amount of space to shrink in MB ” section.

Once the hard disk has been reduced, a new unallocated drive will be displayed in the list. So now just right-click on the unallocated drive and select ” New Simple Volume ” option.

How to manage your partitions in Windows

Now a ” New Simple Volume Wizard ” will be displayed, now just follow the instructions and complete the process by clicking ” Next “.

How to manage your partitions in Windows

That’s It You Have Successfully Completed The Partition Process.

How to Merge two partitions on Windows :

Merging two partitions is quite simple and at the same time is somewhat laborious.

To do this you must have an empty partition, so you must format any one of the partition that you want to merge. Right-click on the partition that you want to format and select the ” Format ” option. Select the file system as ” NTFS “, click here to know more about the NTFS format. Once this is done, that partition is unallocated.

How to manage your partitions in Windows

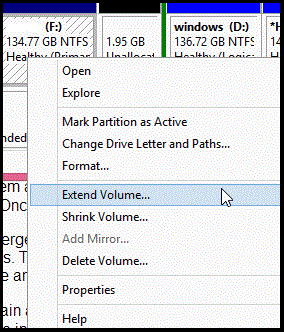
So to merge it with another, we must enlarge the remaining partitions. To do this, just right-click on the partition to which you want to merge and select ” Extend Volume ” option.

How to manage your partitions in Windows

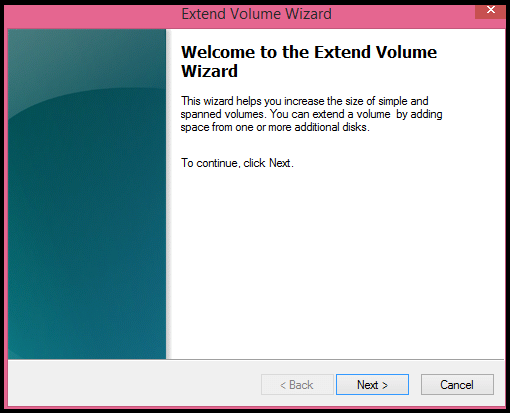
Now again a ” Extend Volume Wizard ” will be displayed. Now just follow the instructions and complete the process by clicking ” Next “.

How to manage your partitions in Windows

That’s It You Have Successfully Completed The Merging Process.

Share Your Views In Form Of Comments…

Categories
PC Hacks

How To Activate The KingMode On Your Windows

Usually when we want to make some configuration in our operating system we directly access the control panel, where we have the overview of the operating system. But sometimes there are settings that are hidden by the system itself, these settings can be accessed by activating the ” KingMode ” in Windows.

KingMode is a hidden system menu with many possibilities , configurations and options. Which are usually not active at a glance such as user configurations, System configuration and many more.

This option displays a menu in which we have access to approximately 274 system settings , all settings grouped by type and sorted in alphabetical order.

Steps To Activate KingMode :

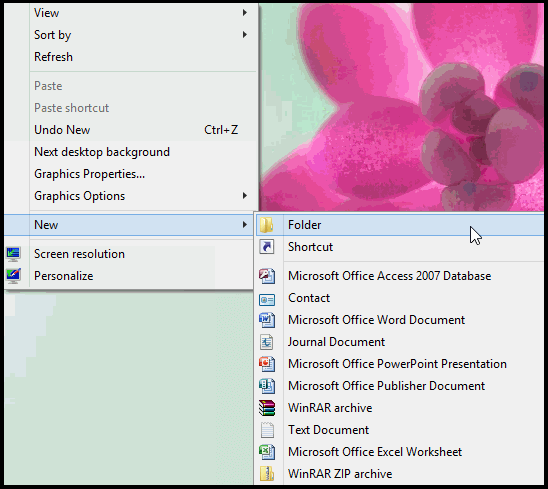
Step 1 : Create a New folder.

How To Activate The KingMode On Your Windows ? , Usually when we want to make some configuration in our operating system we directly access the control panel.How To Activate The KingMode On Your Windows..

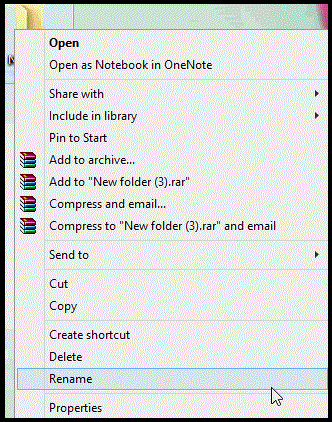
Step 2 : Rename the folder by: ” KingMode.{ED7BA470-8E54-465E-825C-99712043E01C} ” as it is written, without changing anything.

How To Activate The KingMode On Your Windows ? , Usually when we want to make some configuration in our operating system we directly access the control panel.How To Activate The KingMode On Your Windows..

Step 3 : Press enter and see how the folder icon changes.

How To Activate The KingMode On Your Windows ? , Usually when we want to make some configuration in our operating system we directly access the control panel.How To Activate The KingMode On Your Windows..

Once we have completed the above steps, access this special folder just like a normal folder. You can even cut, copy and paste this folder to a desired location.

You have to be really careful while using this alternative Control Panel offered by Windows. Making any changes in this section without advanced knowledge of the operating system could cause several serious issues and bugs. At the farther extent you may even have to re-install the operating system completely.

Share Your Views And Doubts In Form Of Comments…

Categories
System Performance

How To Remove The Junk Files And Windows Firewall Cache ?

Have you ever wondered how you can optimize your computer by removing junk files? and, What if you have a problem with the Windows Firewall cache?

Well, don’t look further, in this article we are going to explain how to free up your hard disk space by deleting the old programs, restore points and also to clear the Windows Firewall cache if you have problems with it or if you are concerned about your privacy.

These steps will remove all the unnecessary files to help your computer to work better and more smoothly.

Steps To Remove Junk Files And Windows Firewall Cache

Freeing disk space by deleting old programs and restore points:

Windows offers you an easy way to remove junk files without using any third party software.

1. To begin, with cleaning we have two options. The first is to go to My Computer, Right-click on the local disk and select properties.

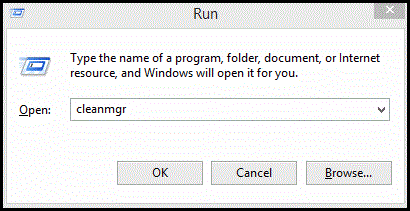
Click on Disk Cleanup option under the general section. The second method is by using Run, press Ctrl + R and type ” cleanmgr ” in the run dialog box.

How To Remove The Junk Files And Windows Firewall Cache ?

2. Once this is done it will ask you to select the hard drive that you want to use, in this case, we are using C:\ drive in which our operating system is installed. Wait until it loads completely.

How To Remove The Junk Files And Windows Firewall Cache ?

3. Now a Cleanup disk dialog box will be displayed with a list of removable items. Select the files which you want to delete by checking the box at right.

Make sure that everything is properly cleaned, once this is done click on OK if you just want to free up space, but if you want to clean your system further click on the view system files option.

How To Remove The Junk Files And Windows Firewall Cache ?

4. Now again your computer will start searching for the files that can be deleted in your system files. Again follow the same process to select the file and delete them by clicking OK.

5. To further free up your space move on to the second tab. Here you have two options.

In the first, we can uninstall programs that you don’t use. Clicking on the cleanup option windows will automatically uninstall the old programs or the program that you don’t use. 

In the second option, you can delete the restore points. The procedure is the same, click on the cleanup option and confirm your removal.

How To Remove The Junk Files And Windows Firewall Cache ?

Here’s How To Empty the Windows Firewall Cache

Cleaning the Windows Firewall cache will help the computer to run properly, and helps more when you have problems with the cache or if you are particularly concerned about your privacy.

Follow the below steps to empty the Firewall cache:

1. Go to ” Control Panel> System Security> Windows Firewall “. Now click on the advanced settings located at the left side of the window.

How To Remove The Junk Files And Windows Firewall Cache ?

2. In the advanced settings page, click on the ” Windows Firewall Properties ” located in the overview section.

How To Remove The Junk Files And Windows Firewall Cache ?

3. Now click on the customize option which is in logging section.

How To Remove The Junk Files And Windows Firewall Cache ?4. Now a ” customize logging settings ” dialog box will be displayed. Here the address of cache file will be displayed in the name section.

Now you just have to copy the address in the Windows Explorer and delete the file ” pfirewall.log ” and Ready! your cache is eliminated.

How To Remove The Junk Files And Windows Firewall Cache ?

This is the way to keep your computer clean and fluid. Share Your Views On This Article In The Comments Section Below …