Categories
PC Hacks

Enhancing Your Pen Drive Power By Converting From FAT32 to NTFS Format ?

The FAT32 is the default format of a USB flash drive when we buy it. Although it is the most common format, it may not be the best since it has several downsides that really make us rethink whether to change it. It is so popular because it is quite simple and the majority of operating systems are able to read it.

Disadvantages with this FAT32 format :

  • You can’t make a partition larger than 32GB.
  • You can not store a file with size greater than 4GB.
  • It breaks up too fast, so that over time it becomes increasingly slow.
  • There may be flaws in the storage system.
  • It has no file encryption.

Therefore, the NTFS format is much better than the standard FAT32 format in getting some more performance, and functions as a hard drive, allowing you to store larger files; also solves all the aforementioned disadvantages.

Moving from FAT32 to NTFS Format :

In Windows, there is a method to pass exclusively from FAT32 format to NTFS format without loosing any file. You can even return to FAT32 format from NTFS by following the same process.

Steps To Be Followed :

  • Open ‘My Computer’ and look for the disk( Removable drive ) you want to transform. Each will have an assigned letter (like: F:, G:, D:, etc.). Remember the disk that you want to change the format.
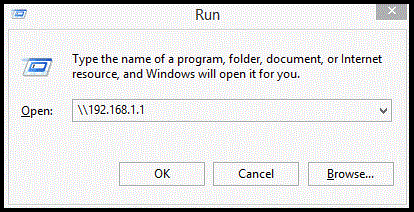
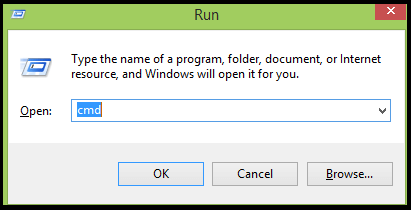
  • Open Run from the Start menu or by pressing Windows + R at the same time and enter cmd .How to Convert a USB Flash Drive from FAT32 to NTFS Format
  • Once opened, type ” convert g: /fs:ntfs ” ( Here ‘ g ‘ is the removable drive ).How to Convert a USB Flash Drive from FAT32 to NTFS Format
  • When completed, you can close it.

That’s It. So now we have our flash drive with a much better format. But depending on what you use it for each unit format will benefit you more than another. For example, if you use it to store movies or files, in general, the NTFS is more recommended and if you want to use it on mobile, and on multiple devices that do not use Windows you must use FAT32.

Note : You can even change your hard drive from FAT32 to NTFS Format .

Categories
PC Hacks Web Guides

How To Connect A Hard Drive To Every Computer On The Network

Many times we may have to move files from one computer to another, say, for printing something or just to watch it. If our computers are not having Bluetooth then we need to move the files to a flash drive or hard disk and later copy them to other devices.

To solve this problem, we have come up with a solution by which you can connect a hard drive to all the computers that are connected to the local network , either by Wi-Fi or Ethernet.

Even If don’t have a hard drive, no need to worry. You can even use a flash drive for this work . What all you need is to have a router compatible with this method.

How To Connect A Hard Drive To Every Computer On The Network

Every Router with a USB input is compatible with this process. Most of the modern Routers have this facility then the old once’s.

Steps To Connect A Hard Drive To Every Computer :

We also need to know the gateway, ie the IP address.

To Check Your IP Address : Follow The Steps Below :

Step 1 : Open Run ( Press ” Windows + R ” to open ) and type cmd in it.

How To Connect A Hard Drive To Every Computer On The Network

Step 2 : Type ” ipconfig ” in the displayed command prompt.

How To Connect A Hard Drive To Every Computer On The Network


Step 3 : Now your Default Gateway will be diplayed which is usually something like ” 192.168.1.1 “.

Follow the given below steps to make your computer to recognize the hard disk or pendrive :

Step 1 : Connect the device to the router.

Step 2 : Now open Run and type the default gateway ( i.e the IP address which we got in the first process ).

How To Connect A Hard Drive To Every Computer On The Network

Ex:\\192.168.1.1

Step 3 : Now a dialog box containing folder like usb0_0, usb1_0, and so on will be displayed. Find out the name which is assigned to the flash drive or hard drive to which you want to connect.

Step 4 : Now open ‘My Computer’, you can do it by just pressing ” Windows + E “. Then just right-click on the bottom left and select ” Add a network location ” option.

Step 5 : Now press Next and select the ” choose a custom network location ” Option.

Step 6 : Again press Next and then introduce your gateway i.e type ” \\gateway\usb1_0 “. In this case ” usb1_0 ” is the flash drive folder and gateway is the default IP address.

Ex:\\192.168.1.1\usb1_0

Step 7 : Give a Name to it and press accept.

That’s It. This is something that will save much time if you usually work on multiple computers simultaneously and do not want to use the services like cloud.

Share Your Views In Form Of Comments….

Categories
PC Hacks System Performance

Free Up Your Disk Space By Deleting The Windows.old folder

Our computers usually have enough storage capacity, and allow us to store many files. It’s like a huge box where we can accumulate hundreds of items. However, the ability to save is also limited. Sure you have repeatedly tried to install a program or download a file, but you  could not due to lack of memory. Today we will teach you how to make some space on your hard drive by deleting the ” Windows.old ” folder.

In our PC we store many files, photos, videos, documents and a lot of programs. These are usually stored in our hard drive. Most of us are not even aware of the capacity of a hard drive. Generally, we go on saving files and never worry about cleaning the drive occasionally.

Probably there might be a time when we want to install a program or save a file and it has not been possible due to lack of space. Obviously at that time we do not want to start looking what occupies more space on your hard disk. For this, today we are going to show you a way to make some space on your hard drive , which could keep you out of any trouble at any time .

” Windows.old ” is an existing folder in Windows 8 that occupies space unnecessarily. By deleting this folder you can greatly free-up your drive space.

Follow The Steps To Free Up Your Disk Space:

  • Go to my computer .
  • Right click on the drive where you have installed your Windows 8 and select Properties .Free Up Your Disk Space Windows.old folder
  • Now properties window will be displayed , move on to General section and click on the ” Disk Cleanup ” option .Free Up Your Disk Space  Windows.old folder
  • Now your computer will start to search the files that can be deleted. It is a process that will take a while.Free Up Your Disk Space  Windows.old folder
  • After the completion of process , Disk Cleanup Window will be displayed .
  • Now click on the option showing Clean system files . Again It is a process that will take a bit of time.Free Up Your Disk Space Windows.old folder
  • Now look for the ” previous installations of Windows ” in the displayed list. Most of the cases it would be at the end of the list.
  • If you look at the right side of the option you can see the folder size, which is usually high. That is the space which will be free-up when you delete this folder.Free Up Your Disk Space  Windows.old folder
  • Check the box on the left side and press OK .

Once this is done, you will have available space on your hard drive. You can even delete other folders which are displayed in the list like ” Temporary Internet Files “, etc.


Share Your Views In Form Of Comments… 

Categories
System Performance

How To Clean Windows Without Using Any External Application

In OnlineCmag we’ve been teaching over time many tricks to help you optimize the performance of your computer and keep your operating system as clean as possible.

We have already covered tips and tricks like: how to improve the speed of Windows startup , how to locate and delete the duplicate files , how to defragment the hard drive and many more tricks .

This time we gonna teach you the way to perform cleanup and system optimization without using any third-party applications. There are many aspects that are necessary to keep Windows clean, but we will focus on the main factors.

Follow The Below Factors To Clean Windows :

  1. Cleaning temporary system files: All the temporary system files are stored in the path ” C:\Windows\Temp “. By removing these temporary files you will gain in space and performance. All the files that you find on this route refer to temporary files of the operating system itself.
  2. Cleaning temporary User files: All the temporary files are stored in reference to the particular user’s location. These files can be found in ” C:\Users\USER-NAME\AppData\Local\Temp “, replace ” USER-NAME ” with your username. Again, all information housed here can be eliminated.
  3. Using Disk Cleanup in native Windows: When windows is installed, it brings certain default applications or options which will help us to maintain it. ” Disk Cleanup ” is such privilege which will help you to eliminate the storms that have previously been in Recycle Bin, temporary files from Internet Explorer, thumbnails, and so on.How To Clean Windows Without Using Any External Application
  4. Using the native Windows defragmenter: In OnlineCmag we have explained the benefits of defragmenting your hard drive. Windows has a default application for defragmenting your hard drive.This native OS application shows the status of the disks and give us the option to defragment.How To Clean Windows Without Using Any External Application
  5. Using the msconfig tool: Launch the Run command and type ” msconfig ” in it and then press enter. Now the system configuration panel with interesting options will be displayed. Here you can tell Windows that how you want to it start, like what applications to launch at startup or what operating system must be loaded by default among other options. This application is not well known but it is certainly one that offers more help in maintenance.How To Clean Windows Without Using Any External Application
  6. Emptying the Event Viewer: This tool will show all the error messages or problems that have been registered by the operating system. So it should be deeply analyzed. After that delete all records since it will not contribute virtually . To remove just right-click and select the Clear Log option.How To Clean Windows Without Using Any External Application

These steps hardly take any time to complete and helps your operating system be more optimized; which will certainly result in a better user experience.

Categories
PC Hacks System Performance

How To Find And Remove The Duplicate Files In Windows

Over time we tend to store large amounts of documents, images and other general files that often end duplicate or triplicate. Especially in the case of images this problem is high. Mostly it is impossible to know whether this is the same file at first glance , since both the location and the file name may be different. So we are not aware of this duplicity and thereby these files consume space on the hard drive.

Application To Find And Remove The Duplicate Files :

To solve this problem, we have a freely available tool known as ” Anti-Twin ” that promises us to find and remove the duplicate files from the computer easily.

Beyond just searching for the files with same names, this tool also makes comparisons based on the following criteria in particular :

  • Name.
  • Location.
  • Size.
  • Extension.
  • Bytes.
  • Pixels.

How To Find And Remove The Duplicate Files In Windows

Thus, Anti-Twin can compare any parameter that we mark in the path to find the duplicate files and create patterns to show what content is duplicated.

Comparison by pixel is one of the most spectacular options as we may have two similar images with different name, size and extension but not with different pixel ratio, unless you crop them knowingly. Thus, the application will analyze the contents of the image for later comparison with other image content.

How To Find And Remove The Duplicate Files In Windows

The operation is really simple, we only need to choose the path where you want to look and explain how you want to apply filter . Once the search completes, you will be asked to choose one of the following options to be performed on duplicates:

  • Move them to a particular path.
  • Send them to the recycle bin.
  • Remove them completely.

How To Find And Remove The Duplicate Files In Windows

After the completion of this process , no doubt that you have freed up your drive space and you also have your documents organized without duplication.

You Can Download It From Here

Categories
System Performance

How To Improve The Startup Speed of Windows – Dummies Guide

As time passes, mostly we notice a degradation in the startup time of Windows. The startup time during the first few days of an operating system’s life is only a few seconds but with time it would drastically increase and could even be several minutes.

The explanation for this degradation is not so simple as there are many factors which may affect the startup speed of Windows.

Factors such as hard disk fragmentation and the number of applications that are to be configured to run at startup , are also the additional tasks that a computer must perform.

Sometimes it is not easy to detect what applications or services are being Run with the startup and not necessarily in the foreground. They may even be launched silently without any notice.

Applications Dragging Startup Speed Of Windows

To overcome this situation and identify which applications are causing trouble to the Windows startup , we have a free tool called  Soluto “. It tests your computer and shows you the results visually( In form of graphs ).

After installing the application, you will be prompted to restart your computer. After restarting your computer, you can get all the necessary data and information about the startup. Soluto will divide all detected applications into 3 groups and display them.

3 Different Types Of Applications :

  1. Critical applications : They can not be removed as they are part of Windows itself.
  2. Potentially removable Applications: These applications can be removed from Windows startup provided that the user is aware about the problems which may arise because of this removal.
  3. Removable Applications: In this group all applications that are expendable and recommended to remove are displayed.

Besides showing the grouped applications, Soluto will allow us to make the necessary modifications in them to optimize our system and increase the startup speed.

You Can Download It From Here

Categories
System Performance

How To Optimize And Reduce The Consumption Of RAM In A Click

RAM (Random access Memory ) is one of the most important elements in any hardware device , either at the user level like in desktops, laptops, computers or even at professional level like in large processing servers .

The Random Access Memory enables the device to load the instructions that run the processor and other computing elements , called the random fact . It is given the ability to enter information in any memory location without any order, and all memory spaces will have the same read and write speed.

Optimize and Reduce the Consumption of RAM , RAM (Random access Memory ) is one of the most important elements in any hardware device , either... Optimize and Reduce the Consumption of RAM in a click.

This type of memory is so important that the motherboard takes a verification process before starting the memory system . If any problems are detected by the operating system, then board will beep to alert you that it will not start.

Giving the importance to this element, it is vital to make good use of it as well as optimize and reduce consumption as much as possible to avoid slow degradation of your computer.

Application To Optimize And Reduce The Consumption Of RAM :

To do this we have a great tool called ” Memory Optimizer “, Which analyze the consumption of RAM and subsequently optimize it to its full potential , all just by pressing a button and its completely free.

Optimize and Reduce the Consumption of RAM , RAM (Random access Memory ) is one of the most important elements in any hardware device , either... Optimize and Reduce the Consumption of RAM in a click.

The application doesn’t have any choice, nor has different parameters and possibilities, its only function is to optimize the memory after pressing the center button.

Optimize and Reduce the Consumption of RAM , RAM (Random access Memory ) is one of the most important elements in any hardware device , either... Optimize and Reduce the Consumption of RAM in a click.

If your computer is running slow because of insufficient RAM, Then we recommend you try this app and comment if you noticed results with it.

You Can Download It From Here.

Categories
PC Hacks Web Guides

Easy Way To Create And Extend A WiFi Signal

Recently my colleague asked me  if there is any way he could extend the WiFi signal emitted from a router . To be totally frank , the first idea that got into my brain is to buy another router which would act as repeater if we connect them in form of a bridge . But in absence of budget we should think of more possible and probably better solutions.

After that I questioned myself if there was any possibility of repeating the signal from a computer. After a bit of research, I found two very interesting applications that were intended to solve this problem, so today we’ll take a look at these applications and show you how to create your access point and extend your wifi signal.

Easy Way To Create And Extend A WiFi Signal

Applications To Create And Extend A WiFi Signal :

1. Connectify Hotspot :

The first application that I encountered is ” Connectify Hotspot “. Which is a highly developed and well known application and is on version 7 now. Basically what this application does is, It creates a wireless access point from any type of internet connection that you have connected to your computer . This is very useful if you want to expand your WiFi signal, or to create an access point from a network Ethernet for sharing internet to other devices.

Easy Way To Create And Extend A WiFi Signal

The only requirement we must meet is to have a network card with wireless technology to lift and distribute the WiFi signal. The best thing with ” Connectify Hotspot ” is that it is compatible with all types of connections that exist today , we can share our network from 4G mobile connection to the old dial-up.

The only disadvantage with this Connectify Hotspot is that it allows only 90 minutes of free trial pack , if we want to use the program completely then we must purchase the full version i.e around $ 40 , Which is quiet high .

2. Virtual Router: The free alternative :

Virtual Router is totally free. In my opinion it is the most sensible option, With it we can do almost the same as with Connectify Hotspot . Even the working principle is same , it just repeats our connection through a wireless WiFi card.

Easy Way To Create And Extend A WiFi Signal

Image Courtesy By : Virtual Router

The operation is quite simple, only we need to select our active connection which we want to share. After that you can name the access point and set a password to it , the default security system that is assigned to that WiFi is ” WPA2 ” . So the level of security is pretty good.

The only downside is that we must always be connected to internet equipment if we want repeat the signal in a given area.

Share Your Views In Form Of Comments…