Categories
Software

Technique To Educe Email Attachments From Outlook PST Files In Bulk

Outlook users are always worried about the size of PST files that becomes corrupt whenever it reaches to its size limit. In earlier versions ANSI PST files only provide 2 GB storage limit, but upgraded versions increase this ability to 20 GB in Unicode PST files. Nevertheless, because of constant usage in corporate sectors, PST file size gets easily fulfilled causing worries to users. In such cases, extracting email attachments from PST file might help to keep your PST file size maintained. The main cause of the PST file increase is attachments, so in this upcoming segment we will be discussing about the Outlook Attachment Extractor tool that will help to extract email attachments from bulk Outlook PST files in one go.

Outlook Attachment Extractor

Integrated with advanced features, Outlook attachment extractor tool has the ability to remove email attachments from bulk Outlook PST files. Without damaging or hampering any other property of PST file the tool works to extract only attachments of all types like doc files, images, audio & video, etc. Users can add more than 100 PST files with tool at a time to extract the attachments, without facing any technicality the tool will obtain all attachments and save them to desirable location in local machine of the user.

Benefits Of Using Tool

  • Remove attachments from bulk Outlook PST files
  • Retain metadata and data file properties unchanged
  • Maintain folder hierarchy of Outlook PST file attachments
  • Works with both ANSI & Unicode PST files
  • Remove attachments from PST file of any size
  • Self-illustrative steps to carry out an email attachment process

Technical Specifications

To run the tool, MS Outlook 2013 any below version installation is mandatory in the user’s machine.Windows 8.1/8/7 and Vista users are required to run the tool as Administrator.There were no special system requirements of tool, some general specifications are required that are capable to handle by any system.

Basic Details About Tool

Size: 3.6 MB

Version: 2.0

Basic Function: Extract all Attachment from Outlook PST file

Trail Facility: Demo Version

Spyware and Malware free: Norton and McAfee secure

Microsoft Windows Support: 2000, 2003, 2008, XP, Vista, Windows 7/8/8.1

MS Outlook Versions: 2000, 2003, 2007, 2010 and 2013

Demo Version Conditions

The demo version of Outlook Attachments Extractor tool is available for users at free of cost. Users can download this trial version of tool in system without investing any money. The trail mode will help to extract first 20 attachments from 5 PST files and will provide a preview of how software works. Once the working and ability of tool is evaluated, users can make an investment in licensed version of tool from official website of organization.

Full Version Details

The full version of Outlook Attachment Extractor tool is available multiple licenses i.e. Personal, Business and Enterprise, to provide a users facility to extract attachments from bulk PST files. By investing in any of the licensed version of tool, users can grasp the facility of extracting Outlook attachments from multiple PST files without facing any limitations. The organization also provides extended support assistance and updates facility along with licensed version of tool.

Detailed Working Of Software – Illustrated

For obtaining positive results out of tool, it is necessary to handle the tool properly. So here we are helping you to with detailed manual of Outlook attachment Extractor tool, to attain perfect and desirable results.

  1. First download and install full version of the Outlook Attachment Extractor tool in your system and run it from Start > All Programs > Outlook Attachments Extractor.
  2. From the initial screen of tool, user has to click on “Open” to start the process of Outlook attachment extraction.

Outlook Attachment Extractor,Technique To Educe Email Attachments From Outlook PST Files In Bulk

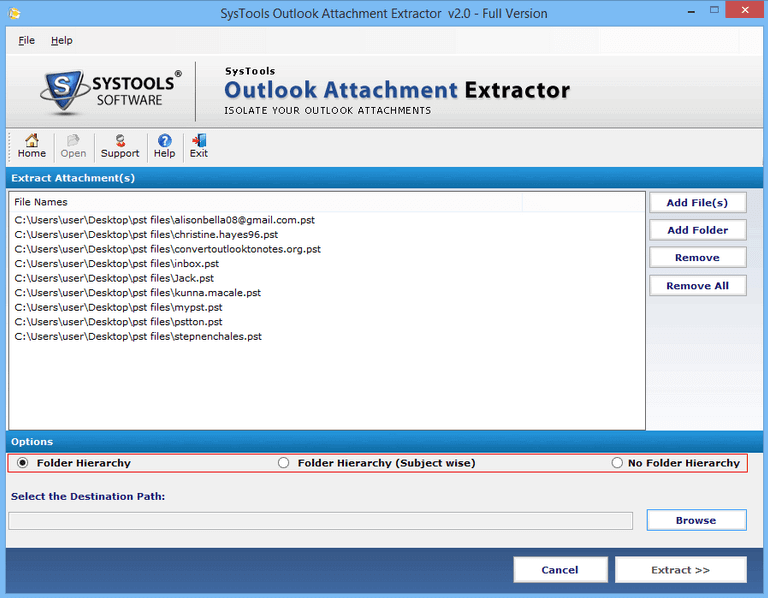
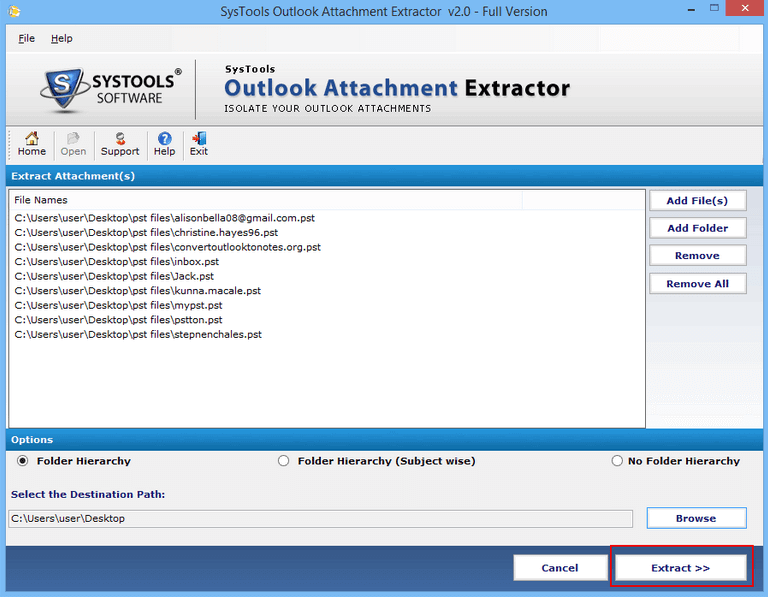
  1. Now click either on “Add File” or “Add Folder” option to add Outlook PST files with tool to extract email attachments.

Outlook Attachment Extractor,Technique To Educe Email Attachments From Outlook PST Files In Bulk

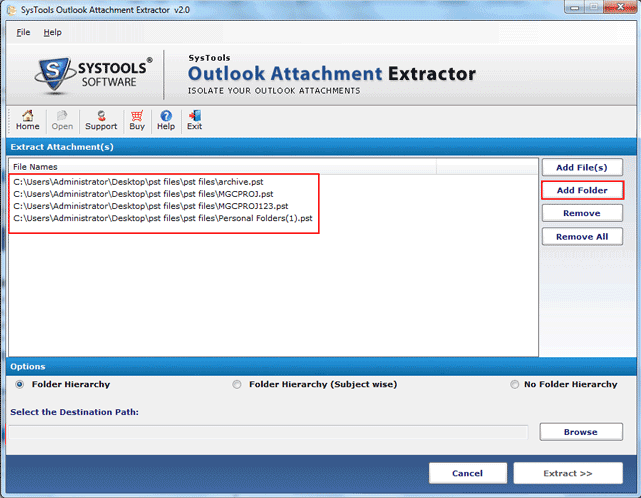
  1. “Remove” and “Remove All” options are also provided to remove accidently or unnecessary added PST files from tool interface.
  2. There are three options i.e. Folder Hierarchy, Folder Hierarchy (Subject Wise) and No Folder Hierarchy, select as per your convenience and proceed to further step.

The folder hierarchy option is provided to extract and save all PST file attachments according to PST file hierarchy.

Folder Hierarchy (Subject wise) option is provided for users save all email attachments according to the subject of all emails.

Choose No Folder Hierarchy option to save all email attachments alternatively as per software ability.

Outlook Attachment Extractor,Technique To Educe Email Attachments From Outlook PST Files In Bulk


  1. Provide a destination location to software for saving all extracted Outlook email attachments and click on “Extract” to start the process of Outlook Attachment Extraction.
  2. As soon as you click on “Extract” option, the tool will provide a preview of progress summary with details like number of files and pending and errors count etc.

Technique To Educe Email Attachments From Outlook PST Files In Bulk


  1. On completion of the process the tool will prompt a message stating process is complete, click on “Ok” to proceed.

Technique To Educe Email Attachments From Outlook PST Files In Bulk

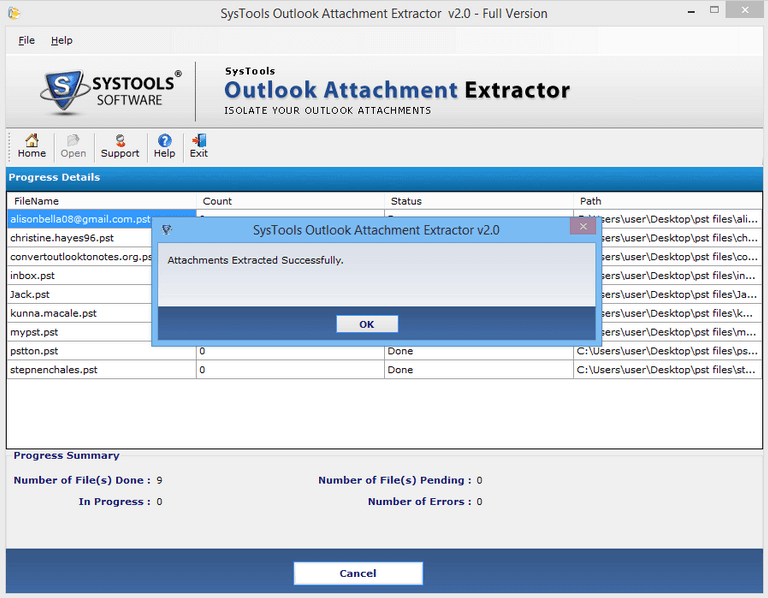
  1. Users can view the CSV log report of Outlook attachment extraction process from the destination location.

Observations Made

Positive Aspects Of Tool: The tool seems to be swift, simple and secure process of removing attachments from Outlook PST files in bulk mode. It retains metadata and formatting of emails during attachment removal process. Plus, the interface is designed by considering the needs of novice users to technical industry.

Looked Improvements:

If the provision to choose emails, files for which attachments are required, it could be beneficial for users in some way. They can choose only required files and save time to extract Outlook attachments.

Conclusion

In the bottom line of this section we can only conclude that, Outlook Attachment Extractor tool is all-in-one solution to remove attachments from any number of Outlook PST files. The tool without harming original data of PST files, extracts attachments and save them to a location of their choice in system hard drive. The tool is an affordable investment for users with advanced set of features that promise to provide assured satisfaction.

Categories
PC Hacks Software

WhoCrashed: Discover What Is Causing Your Computer To Crash

WhoCrashed is a tool that allows you to analyze errors which caused your computer to restart, shutdown, hang up, or show a BSOD.

This post is for all those who use Windows (usually quite a few people) and have suffered sudden crashes or blue screen (less common things than people think) and want to find out for themselves what caused the problem and whether it is possible to fix their PCs without pulling away or call a technician.

WhoCrashed: Discover What Is Causing Your Computer To Crash Or Show A Blue Screen

In OnlineCmag, every day we talk about something new, and thanks to the blue screen of my laptop which helped me learn of the great tool WhoCrashed.

Who Crashed it ?

WhoCrashed is a tool that parses the Crash file Dump and reveals who or what is causing the ruin of your computer. Sometimes when Windows restarts it suddenly hangs, or throws you a blue screen of death, no obvious apparent reason, without notice, without proper error report, nor any clue, the first thought in anyone experiencing it is that it is some fault in the hardware. But it isn’t exactly true, blue screens are almost always caused by incompatible drivers or by any miscellaneous new software. Fact is that the driver malfunctioning is the number one threat, and Windows 8 / 8.1 seems to suffer from this way more than Windows 7.

The answer in a click…

If the faults are caused by drivers or defective kernel modules, you will only see a blue screen if the computer is configured to show, but what happens is that the PC is restarted just as if possessed by some devil. Instead of calling the Warren you can use WhoCrashed to find out what is the cause of failure.

WhoCrashed shows the failed drivers you have on your computer, and even you can check out the drivers that have caused damage in the past. WhoCrashed performs a “post-mortem analysis” of crashdump and organizes information in an understandable way.

WhoCrashed enabled crashdumps :

The crashdump is a file that is generated after the computer experiences a crash, a spontaneous reboot, or blue screen. The directory of crashdump is: C:\Windows\Minidump and by default they are not active on your PC.

WhoCrashed: Discover What Is Causing Your Computer To Crash Or Show A Blue Screen

To enable crash dumps in Windows go to Control Panel> System and Security> System> Advanced System Settings> Select the Advanced tab and press Settings in the Startup and Recovery section. Now in the table options mark all boxes under Fault system. For best results select a complete dump.

WhoCrashed can cause a controlled crash of your PC to test whether the crashdump works. If you had already enabled, you only have to start analyzing and receiving the responses.

If at all you really want to test this tool before using it, you can check out and use any of top three methods to crash a computer here and get their crash reports.


Finally, WhoCrashed is primarily aimed at intermediate and advanced users, system administrators, power users , and not for newbies. This program tells you what is causing the problem, but does not give you the solution, for it, one must understand the report and continue the quest of problem solving.

Categories
Security Software

Getting To Know The Windows Military Grade BitLocker Tool Better

For sure, 2014, has been tiresome and shocking for the entire computer security world. With a whole new range of vulnerabilities surfacing up and some major bug fixes throughout the year, this year really went exciting enough. If at all you missed any of this, catch more of the biggest security stories of 2014 here.

One of these biggest security pieces is the end of services by TrueCrypt. In May 2014, the creators of TrueCrypt ended the services offered by the popular encryption tool. This decision was based on several security concerns and some licensing issues playing their part. TrueCrypt was anyways humble enough to recommend its users to look for alternative solutions. BitLocker, undoubtedly is a the perfect alternative as it can get and here’s our take on this Microsoft’s Encryption Tool.


Understanding What BitLocker Is All About:

BitLocker is Microsoft’s encryption tool for Windows. Not all Windows Operating Systems have BitLocker in them, but you don’t have to worry if you’re running on the Enterprise editions of Vista, Windows 7 and Windows 8 or the Pro version of Windows 8.1. All these Operating Systems including few Windows Servers support BitLocker.

The main thing about BitLocker is it helps you pile on additional security to your data with encryption. BitLocker, being a drive encryption tool means that it makes all the data on your drive unreadable for everyone except you. Thus offering you the best protection in case of offline attacks.

Here protection against offline attacks is applicable in case of USB drives, wherein the entire data can be encrypted. So, even if you were to lose your USB drive (or say gets stolen), there’s no harm in it. And the other person surely cannot read what’s inside the drive.


The System Requirements:

For BitLocker to run, you’ll need to have any one of the above mentioned Operating Systems. Also the minimum number of drive partitions should be two. So that you can make sure you aren’t encrypting the systems volume, i.e. from where your computer boots. Because it would only make the booting process more tedious if encrypted.

The other main requirement is the TPM (Trusted Platform Module). If you know what is TPM is you can skip the next section. If not, then we recommend you to go through the next section as well.

And in any case you are dubious if your computer matches the above criteria, there’s nothing you’ll have to worry about. Once you run BitLocker, it will run a system check just to check if it can operate on your computer.


Trusted Platform Module (TPM):

TPM is a hardware module present on all of those motherboards manufactured after 2006. It is a chip which carefully monitors the booting process, just to make sure there’s nothing messing with it, in order to get around the encryption.

However, the functioning of a TPM is not fixed. Based on your choice, the TPM may ask for a PIN before the OS loads or you may use a particular USB drive as a key to log onto your computer. Or you could do both, however you set it, the TPM monitors the sequence of operations according to your consent.


Why Should Anyone Use BitLocker?

If you are concerned about your data theft or privacy, then believe me, BitLocker is the best tool you are going to get; that too with purchasing a computer. Actually, this is a military grade tool which is developed keeping in mind how digital our lives have become. And surely we believe its one of the best of what Windows could offer us.

Do you like the idea of BitLocker? Are you currently using BitLocker? Do you have any other doubts about this tool? Talk all about it in the comments sections. Let people hear you out.

Also See: How To Protect Your Computer Using BitLocker

Categories
PC Hacks Software System Performance

Fully Improving The Windows Task Manager

Recently we explained ” how to customize the Windows Task Manager “, on that occasion we focused on changing the look of the native application that is brought by the operating system, the application just occupied disk size and its functions were also limited.

This time we present a way to give a full turn to the task manager , leaving the application that incorporates Windows and using AnVir Task Manager as an alternative.

Fully Improving The Windows Task Manager

The advantages of using AnVir Task Manager versus traditional manager are amazing , improvements in data visualization, data offered, ease of use and improved product available almost ridicule the traditional task manager.

It is possible that in this article we describe all the features that are offer by it, so we recommend  you to make use of this great application.

Features Of AnVir Task Manager :

Full details of each application that are launched on Windows startup:

  • Initiation
  • Name.
  • Company.
  • Location in the registry.
  • When added to this list.
  • Current state.
  • Resource consumption.
  • Release date.
  • Option to launch and stop the process.
  • Disable.
  • Edit.
  • Programming delayed start.
  • Etc.

Full details of active processes:

  • Name.
  • Product.
  • Level of risk to your computer.
  • It starts at Windows startup or not.
  • CPU consumption.
  • Consumption of hard disk.
  • Bandwidth consumption.
  • RAM consumption.
  • Priority.
  • Date of first detection.
  • Charts representative of all the values.
  • Etc.

Full details of the active services:

  • Name.
  • Level of risk to your computer.
  • Identifier.
  • Service startup type.
  • State.
  • Description.
  • Product.
  • Date of first detection.
  • Possibility to perform online virus scanning service.
  • Consumption of hardware.
  • Etc.

These options indicate that you are not all that allows far , it is only a small part of all the information and actions you can perform using this awesome app.

Finally indicate that there is a paid version and a free, I recommend starting with the free because it meets and exceeds the expectations that we have put into it.

AnVir | Task Manager Free

AnVir | Task Manager Pro

Categories
Software

Introducing The Best And Free Alternative To Adobe Photoshop

The most professional application that has existed for years in the market for editing and retouching photos is Adobe Photoshop, but its high price is causing other applications that offer similar options to become a big gap in the market and their usage is growing rapidly , even in professional fields.

Best Introducing The Best And Free Alternative To Adobe Photoshop

Free Alternative To Adobe Photoshop :

The application that we are going to introduce is ” GIMP “, and it is possible that you have already heard of it, even if you have never tried it.

Its market share had grown widely and is no longer strange even if we find jobs that request us to know this tool directly or indirectly. Soon as this application has become a serious contender to be the dominant in the field of photo editing software.

GIMP has plenty of advantages, starting with its cost. Its a freeware with more hundreds of editing options.

Salient Features Of ” GMIP ” :

Best Introducing The Best And Free Alternative To Adobe Photoshop


  1. Multiple Selections : Rectangular, spherical, hand loop, magic wand, color, investment, juxta position, etc.
  2. Painting Tools : Brush, airbrush, fill, textures, gradients, etc.
  3. Extensible Sets Of Brushes.
  4. Modification Tools : De scaling, skewing, deformation, cloned plane, cloned into perspective and brush cured.
  5. Tool for creating and manipulating text.
  6. Colored filters : Focus, blur, deletion or addition of spots, shadows, color mapping, etc.
  7. Effects and image processing.
  8. Wizard for creating buttons, logos or other images.
  9. Create and edit masks.
  10. Creating and editing routes.
  11. Simple calculation and measurement of lengths and angles.
  12. Advanced to undo, the work options in case you want to change what you have done.
  13. Full management of macros : Automating tasks using macros or scripts.
  14. Extensions : offers community-developed extensions for adding functionality to the application.

All these features are supported by a community that, in addition to provide technical support to users and provide a forum to help , are in continuous evolution for an even better product.

As you can see, the options for editing photos are stunning and GIMP has nothing to envy any professional photo editing software and payment, so we suggest you try and comment us your experience.

GIMP | Download

Categories
PC Guides Software

Five Tools That You Should Carry In Your USB Memory

Portable Programs are those which don’t need any installation for them to be used on any PC, only the executable programs need to be installed and in some cases a folder that contains program files is also required. If we combine these programs with the versatility that is provided by the USB sticks, then we can take wherever we want without relying on the PC that we are going to work on. Today we have a collection of programs here for you that are believed to be very essential, and are to carried in every USB drive.

Five Tools That You Should Carry In Your USB Memory

List Of Items You Should Carry In Your USB Memory :

CCleaner :

As we all know CCleaner is a very good optimization tool for computers. It Deletes cookies, files stored in the cache and even cleans the registry of your PC. It also has more advanced options like uninstalling programs, modifying the Windows startup or deleting units. In any case, this is one of the most desirable to have applications. You can download it from Softonic.


Malwarebytes Anti-Malware :

Security is a very important aspect in Windows, and even a slight misconsciousness may set the path for Malwares or Trojans or strain adware to enter into your computer. We suggest you the Malwarebytes Anti-Malware, as it is one of the most popular complete level antivirus database. Also, offering its users best real-time analysis, a filter to prevent potentially dangerous websites and also three different methods of scanning viruses is surely a class apart from the rest. To download, just click here and once downloaded, install the version on your portable USB memory.

Also See : How To Detect Malware Infection On Your Computer.


VLC Media Player :

VLC Media Player is one of the most popular and simple to use player. It facilitates its users with a very wide range of codecs, so there is no need to worry about the format of the video which you are going to play. You can Download the portable VLC media player from Softonic.

Also See : Easy Way To Convert A Video to ASCII Using VLC Media Player.


ImgBurn :

ImgBurn is a lightweight DVD/CD/Blu-ray/HD-DVD burning application that every computer user should have. It offers many modes of operations like write, read , build , verify and discover. Its true that the use of CD or DVD is increasingly on the wane but it is worth to relocate ImgBurn on our USB as you can save the odd surprise. To download, you will have to enter the download server and once downloaded, install the portable version on to your USB memory.


Chrome :

One of the best browsers available on Windows could not miss our USB memory. As we are using a PC which is not ours, so in order to avoid the information sharing between the browser and PC it is always recommended to use a portable browser.To download, you will have to enter the download server and once downloaded, install the portable version folder on to your USB memory.

Similarly there are many portable programs that can be added to this list of your USB memory. For better experience just search for Google’s version of portable program and download it.

As always, we recommend that only link to download server that you have known not to contain any virus as it is very easy for any sneaking Trojan to enter your system in the name of Portable software.


Categories
Security Software

Some Of The Best Tools To Sandbox Programs In Your Computer

Everyone likes to try new programs in Windows but not always do it with caution. To avoid shocks or conflicts between a test program and Windows, a good solution is to use a sandboxing tool.

Trying a new Windows program is something which we usually do, and everyday there are hundreds of emerging new utilities that improve our current state. However, most of the programs are safe and there’s nothing to worry about. But sometimes some wayward program may bring in some bugs into your Windows computer. To avoid such problems, there are several possible solutions like using virtual machines or by performing system restore or even by using a sandbox technology. Today we are going to introduce you to some of the best tools for sandboxing your programs. But before that, here’s something about sandboxing.

Some of the Best Tools to Sandbox Programs in Your Computer

The sandbox technology is basically to create a virtual environment, where you can run programs or processes without directly relating them to the rest of the system. In this way, you can run a fully functional program and in case of any failure, there wont be any affect to the other programs or the operating system. This technology has been around much but has not become popular until it was used in OS X and Google Chrome. The advantages of using sandbox are many, mainly related to security and ease of adoption.

Sandbox Tools for Windows :

Sandboxie :

We start with the most popular tool for sandboxing in Windows. Sandboxie is an incredibly easy to use and very intuitive tool. It will not cost you anything to learn to take advantage of it. It will virtually serve any application , from programs to games, Internet and the rest. It also allows exporting files created within the sandbox for use in Windows, because by default all files created are deleted. You can test for a limited time and purchase a license for personal use for only $ 22.15 or 15 €.

iCore Virtual Accounts :

Another option to consider is iCore Virtual Accounts . As in the previous case, it creates a virtual sandbox to run specific programs, it is compatible with most programs, including web browsers or games, barely noticeable resource consumption and is very easy to use and manage, and can create two or more virtual spaces for different uses. Among its advantages, it also allows you to create a customized version of sandbox to fit your needs completely before installation.

Evalaze :

Available in three different versions, one free Evalaze provides a simple environment to virtualize applications without affecting Windows. On his website you will see a list of supported applications , although you can try on your own with specific programs or games. The process is very fast using a handy wizard that guides you step by step on what you must do.

BufferZone :

Something more complete is BufferZone , which lets you create virtual spaces for your programs and perform a host of activities, such as accessing web pages, opens mail messages and attachments within these virtual spaces, talking on IM safely and even share files over P2P networks. In this sense, BufferZone acts as a kind of filter between your programs and Internet threats. In addition, as with virtual machines, it even allows you to backup in order to restore the configuration of the virtual space in case damaged by the malfunction of a program.

Browser in the Box :

Browser in the Box specializes only the Internet safely. This sandbox tool creates a virtual space in which you can run the web browser, which is only a virtual machine with Debian, Linux and Firefox . Although resource consumption is high, it provides a safe navigation and will not download or install any malicious program. If in case, you want to then you can directly restore the virtual machine at any time. Anyway, if you think that downloaded files are safe, you can extract them from Browser in the Box for Windows.

Comodo Internet Security :

This comprehensive security suite offers all kinds of tools, such as antivirus, firewall, antispyware, protection in the torn and also a practical module for running applications under sandbox . Like the rest of Comodo Internet Security options, even creating a virtual space or sandbox is very simple. Just go to “Sandbox Tasks” and click on the “Virtual Run” button. After selecting the programs that you want to run in the sandbox, it will start in protected mode. On the other hand, you can do directly from Windows Explorer by right-clicking on the program and selecting “Run in COMODO Sandbox” option.

Cameyo :

Another option to consider is Cameyo , which converts all files of a program to a portable version that includes within it a single executable file to work. In this sense, Cameyo creates a sandbox that allows the usage of programs without affecting Windows, which is another very practical and easy to implement sandbox possible solution for Windows.

Categories
PC Guides Software

Know About Your Processor In Detail With CPU-Z

As we have recently seen in the analysis of GPU-Z application , Windows only offers a limited amount of information about our hardware equipment. So we should use some third-party applications to get the complete information about each components present in our computer.

This time we focus on the analysis of all aspects of the processor by using CPU-Z; which can be downloaded at the end of the article.

This tool allows you to access all the information related to the processor and also the hardware that is installed on your computer.

Parameter Section Of The Processor and Other Component( By CPU-Z ):

  • CPU : It shows the microprocessor core data. This section contains the information about the make, model, frequency, bus speed, core speed etc.Know About Your Microprocessor In Detail With CPU-Z
  • Caches : This section focuses on information related to processor cache memory.Know About Your Microprocessor In Detail With CPU-Z
  • Mainboard : It contains the data related to the motherboard that is holding the microprocessor.Know About Your Microprocessor In Detail With CPU-Z
  • Memory : It displays all the necessary information about the installed RAM, like the type and quantity to the frequency at which you are working.Know About Your Microprocessor In Detail With CPU-Z
  • SPD : Shows the point Memory similar information but allows us to select a single slot instead of all available memory.Know About Your Microprocessor In Detail With CPU-Z
  • Graphics : Provides data about the graphics card installed on your computer.Know About Your Microprocessor In Detail With CPU-Z,Know About Your Microprocessor In Detail With CPU-Z
  • About : Shows the information about the CPU-Z application.Know About Your Microprocessor In Detail With CPU-Z

Hence this simple, powerful and free tool called CPU-Z lets you know every aspect of your Processor.

Download | CPU-Z